Game Author: Team Cherry
Origin: Steam Link
Map used for screenshots: Web Link
Presentation
Silksong felt so amazing to play that I ended up doing all the boss fights hitless during my blind run (after many tries). Then I craved for more, and went for a full any% hitless run, this was insane and took me weeks of training and failing, yet in the end I succeeded.
After some pondering I’ve figured that sharing my processes and strategies in detail might interest other people and maybe even help some in that crazy endeavor! The best way to experience this would be to play the hitless run while reading on each step to fully get the context and actions, I heavily recommend doing that.
To make things clear though, I very much like to homebrew so you’ll likely find a lot of unorthodox or even less optimal/popular decisions taken, because they fit my goal and playstyle more. Take what you will and feel free to discuss things. Here are the steps of my half-assed script to perform any%, the reaper mist route.
Overview
Moss Grotto
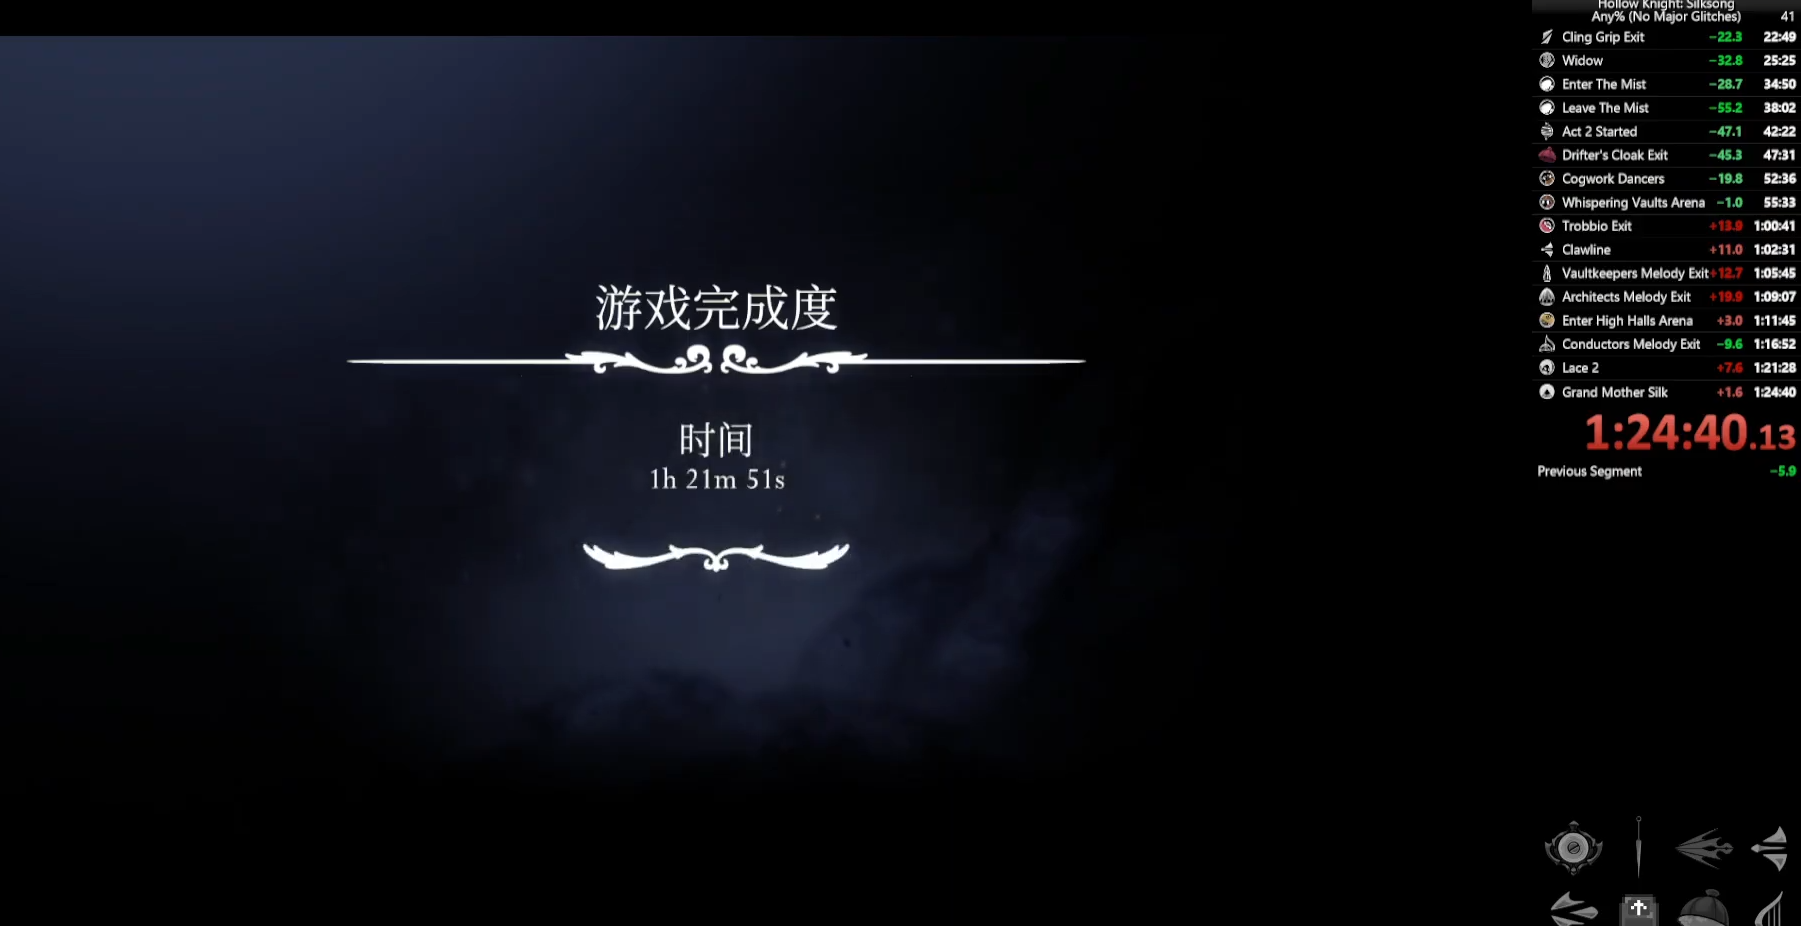
To start with, I had to change the language to simplified chinese as we still don’t have a text speed setting, and for the amount of retries, the faster you go through dialogue, the better. Skip through the whole intro then start walking. To go faster whenever there is space, I jump then do a pogo at the apex, making sure I’m high enough that it won’t make me hit the ground and lose some frames to recovery.
However, despite how it seems, I really don’t care for proper optimization and won’t bother doing all the optimal jumps, this isn’t a speedrun, it’s a hitless run where I don’t want to waste time on the early bits. For the same reason, I will do a pogo on the vines, making use of the fall cancel to immediately attack again and break it slightly faster.
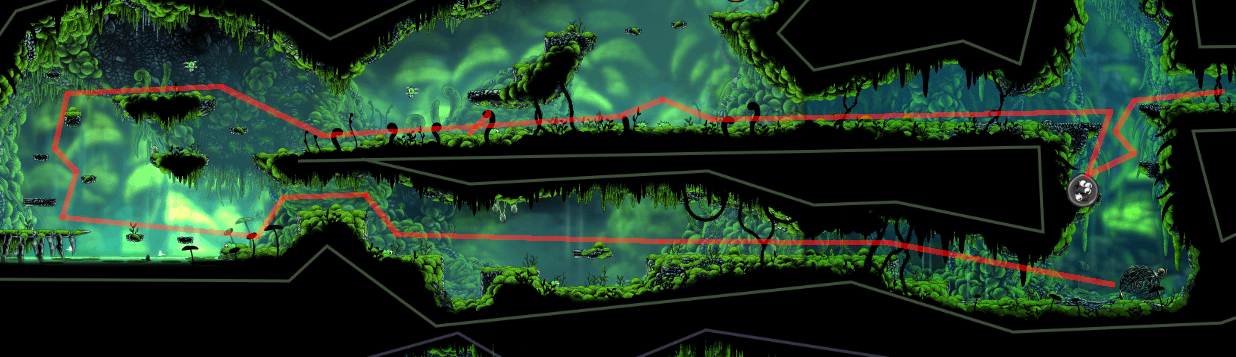
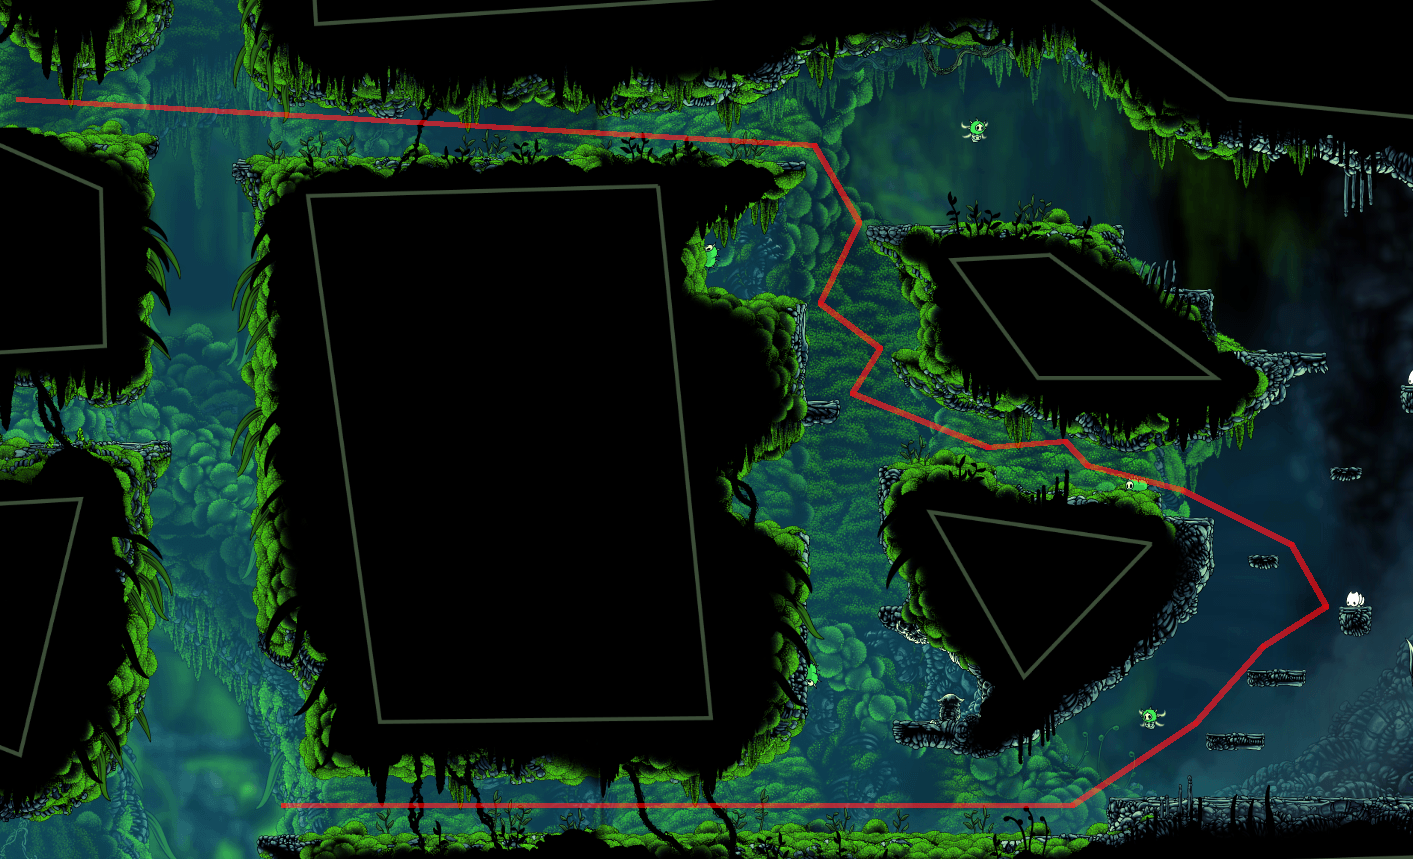
On the first main room, I just follow the path with some pogo, the exact timing allowing me to skip over the few enemies wandering. If it’s off, just take time to properly avoid touching them but overall is a thoughtless room to go through. I will kill the grub while taking the path under as it feels faster than going above and less risky compared to doing an angel fall above enemies.
For the exhaustion sequences, I’ll try to do a jump and pogo at the right time to move farther before it stops me to go very slowly. Make sure not to forget the first rosary string under the cliff.
For the rest, nothing much to note, wait a bit to grab the ledge on the roly-poly bug platform and if you don’t have the right timing, kill the worm safely in the small tunnel. Then it’s straight to the boss, here you can start the fight early by breaking the entrance cocoon.
I’ve gotten hit many times from being careless against Moss Mother, so to ensure absolute safety, I will only do 1 jump attack before waiting for hers. The very first charge is scripted to always do a roof slam, so you can safely wail on her in the corner. When she recovers if you can be positioned right of her so she charges into the corner again, it’s a good outcome but not a necessity as a simple jump avoids the charge.
Whenever you fall back into neutral and it hasn’t been long, you can steal a single jump attack, but be very wary of potential quick charges from being hurt, if that happens jump backwards immediately, and try to do a pogo in her movement direction, it will prevent getting hit if your aim fails due to offset positions. Keep the safe kiting going until victory.
Charge: Punish with a pogo, followed by a falling hit. If too close when attacked, jump backwards and pogo in her movement direction.
Summon: Only punish with one hit then try to clear the worms when possible but keep an eye out for a charge.
Rockfall: Punish as much as you can but fall back when the rocks have fallen.
Nothing much else happens, beeline through the cutscenes and Bone Bottom, proceed to The Marrow.
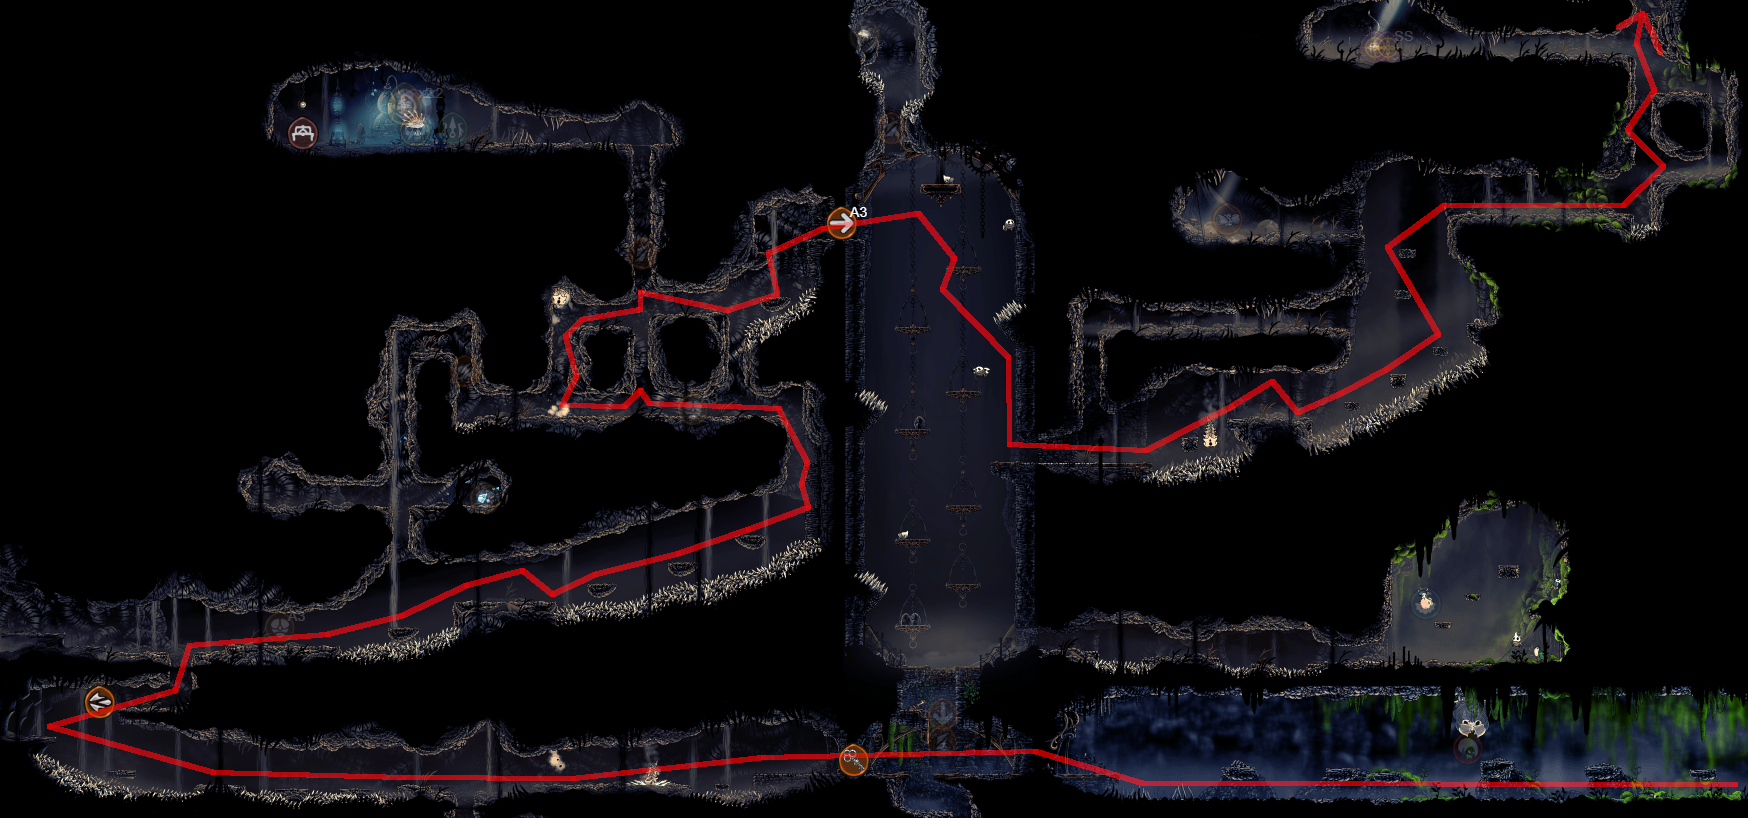
The Marrow
For safety, I always kill the crawler in the narrow passage. The rest is basic platforming, pogo on the big crawler to reduce risks.
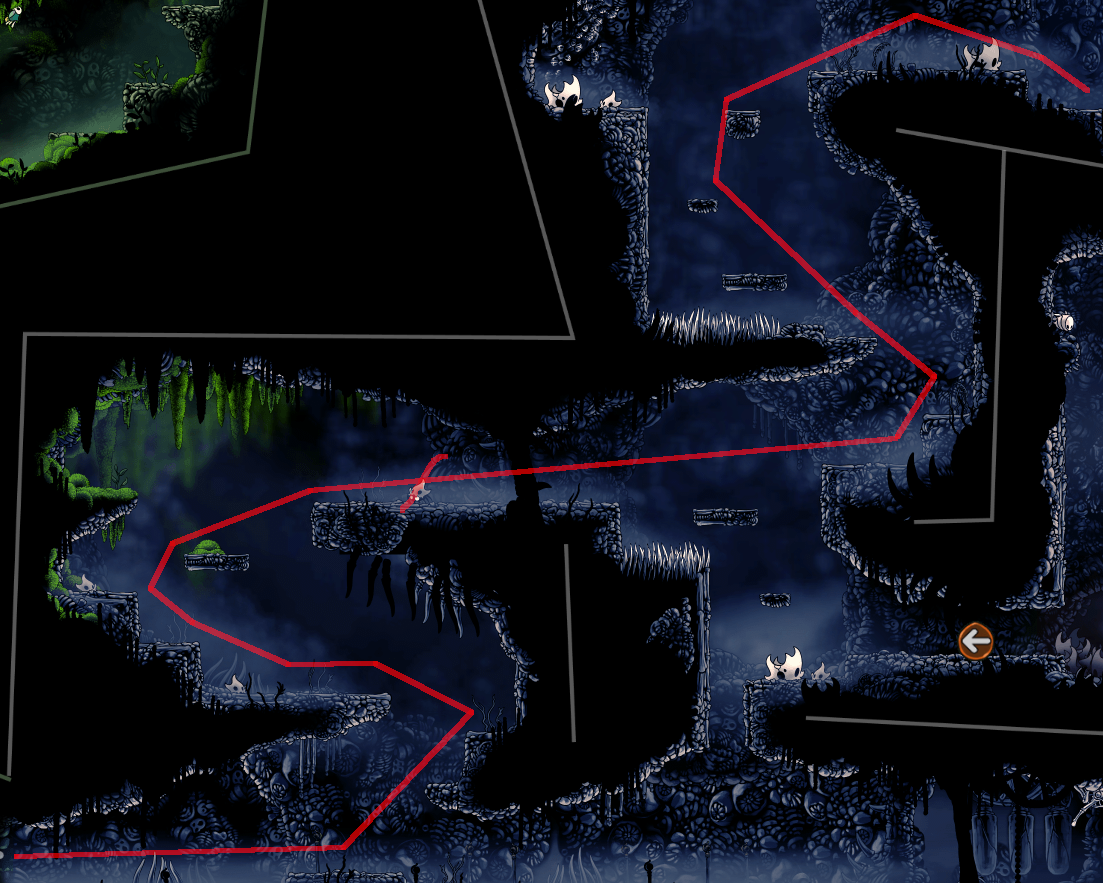
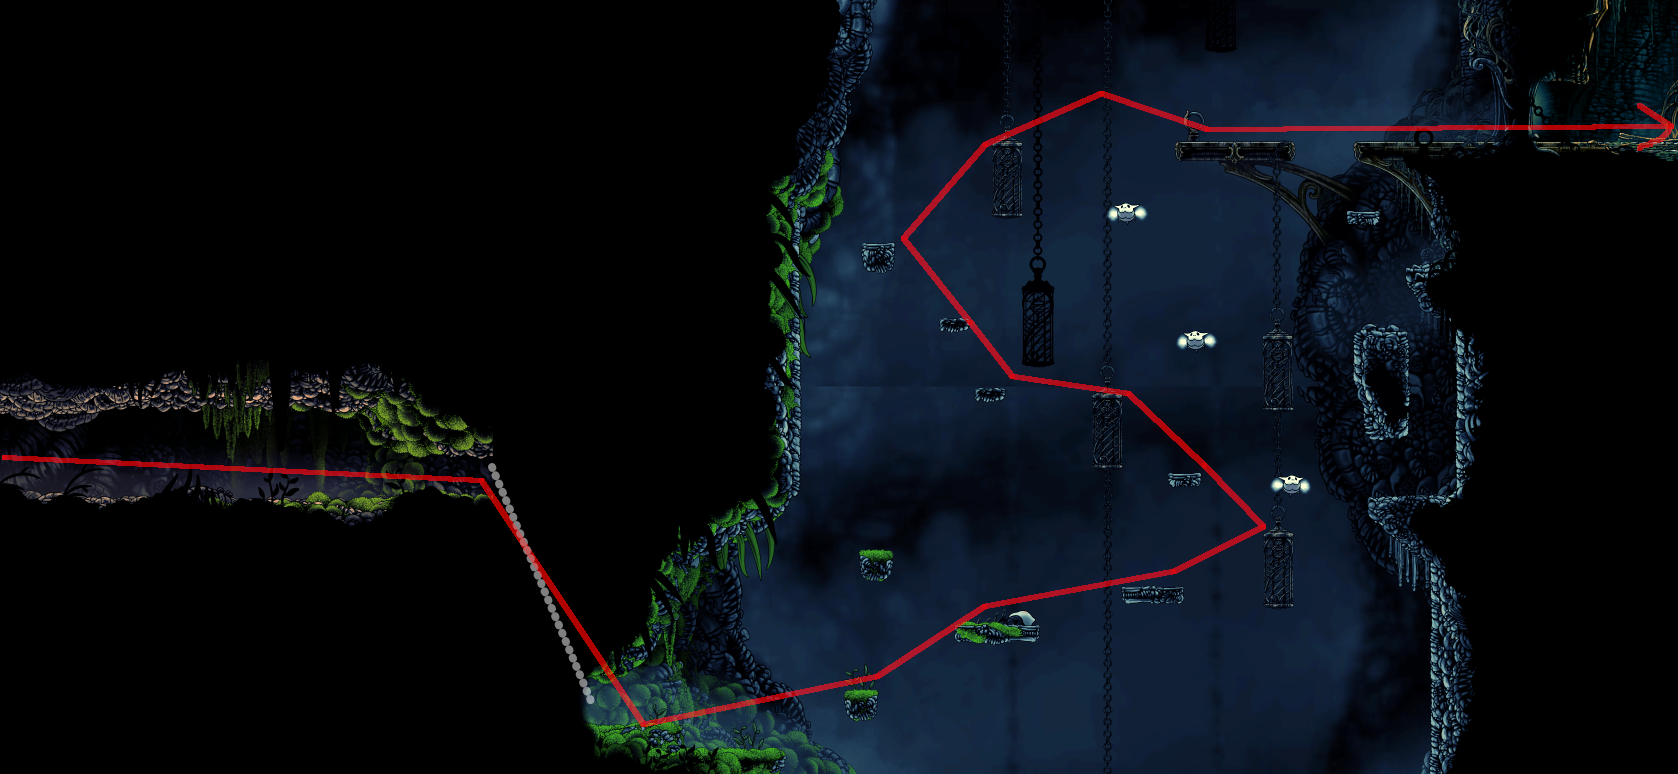
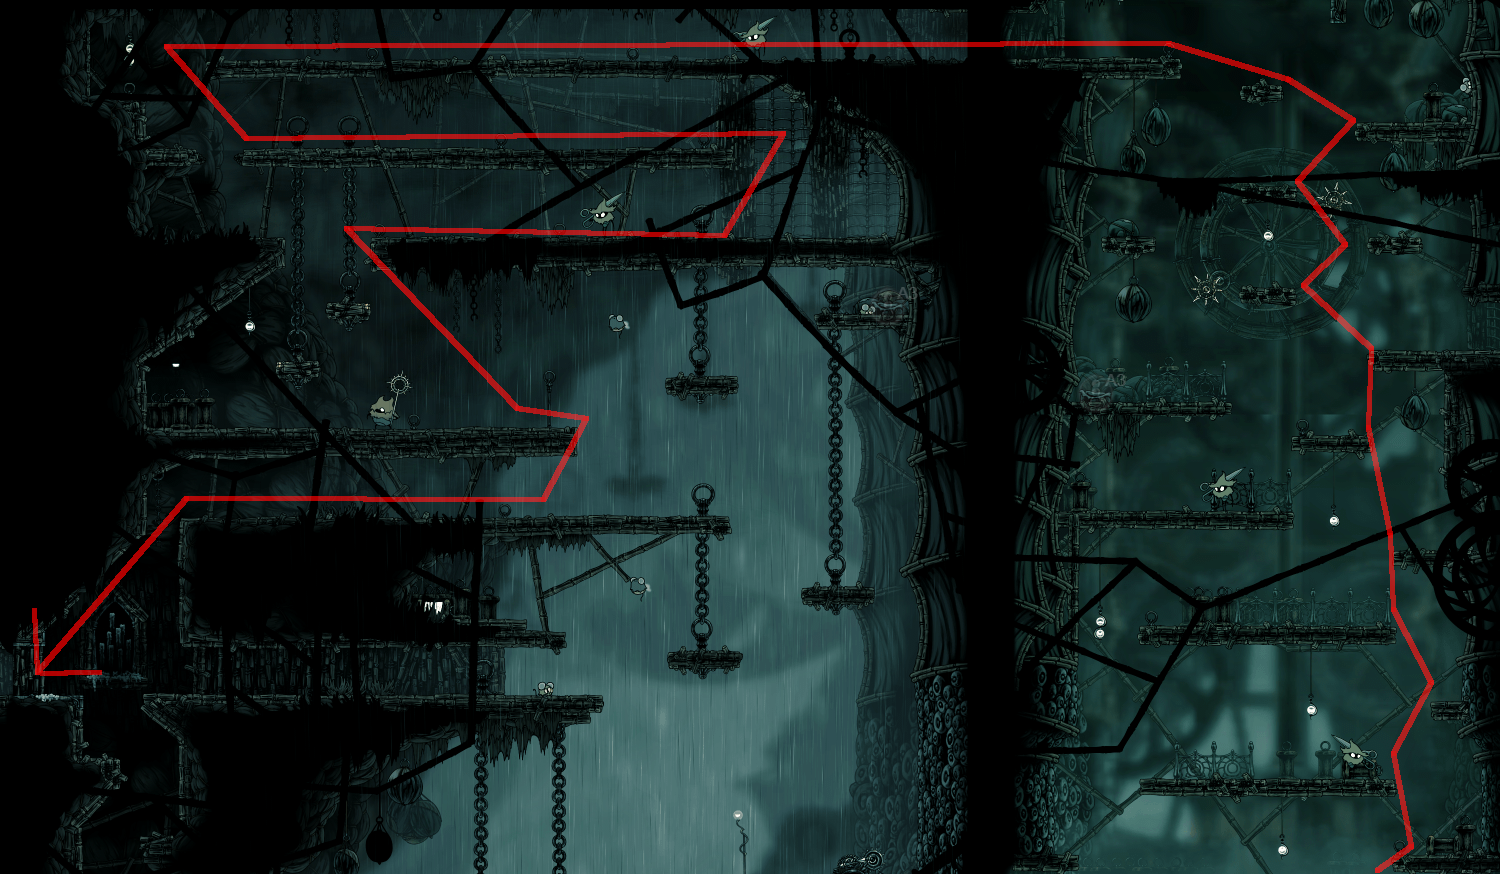
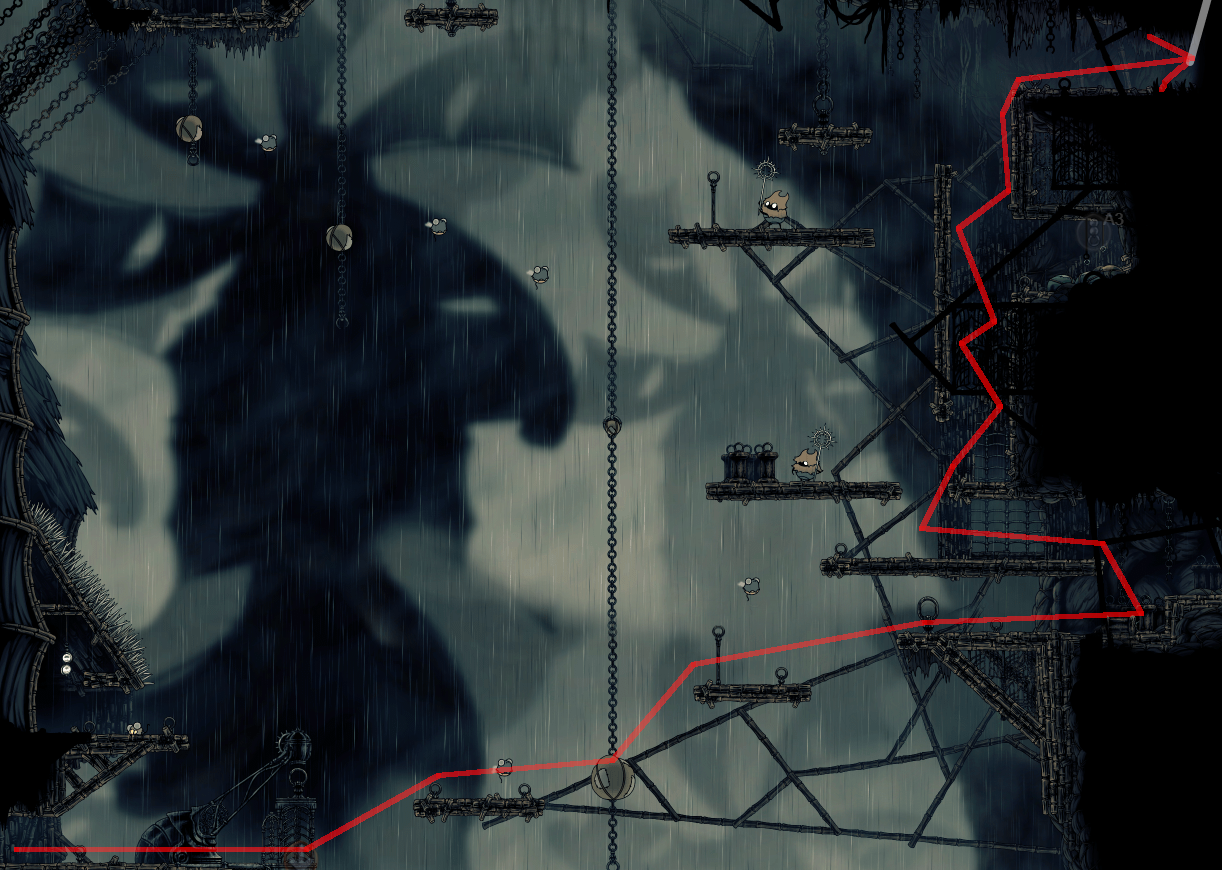
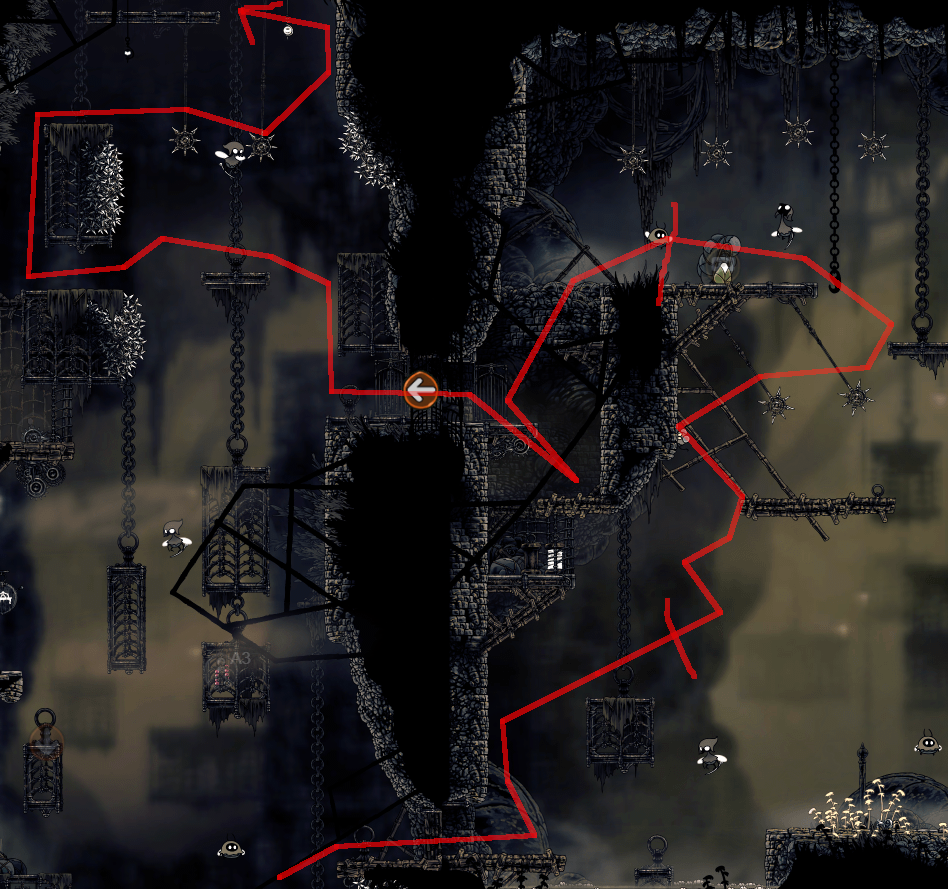
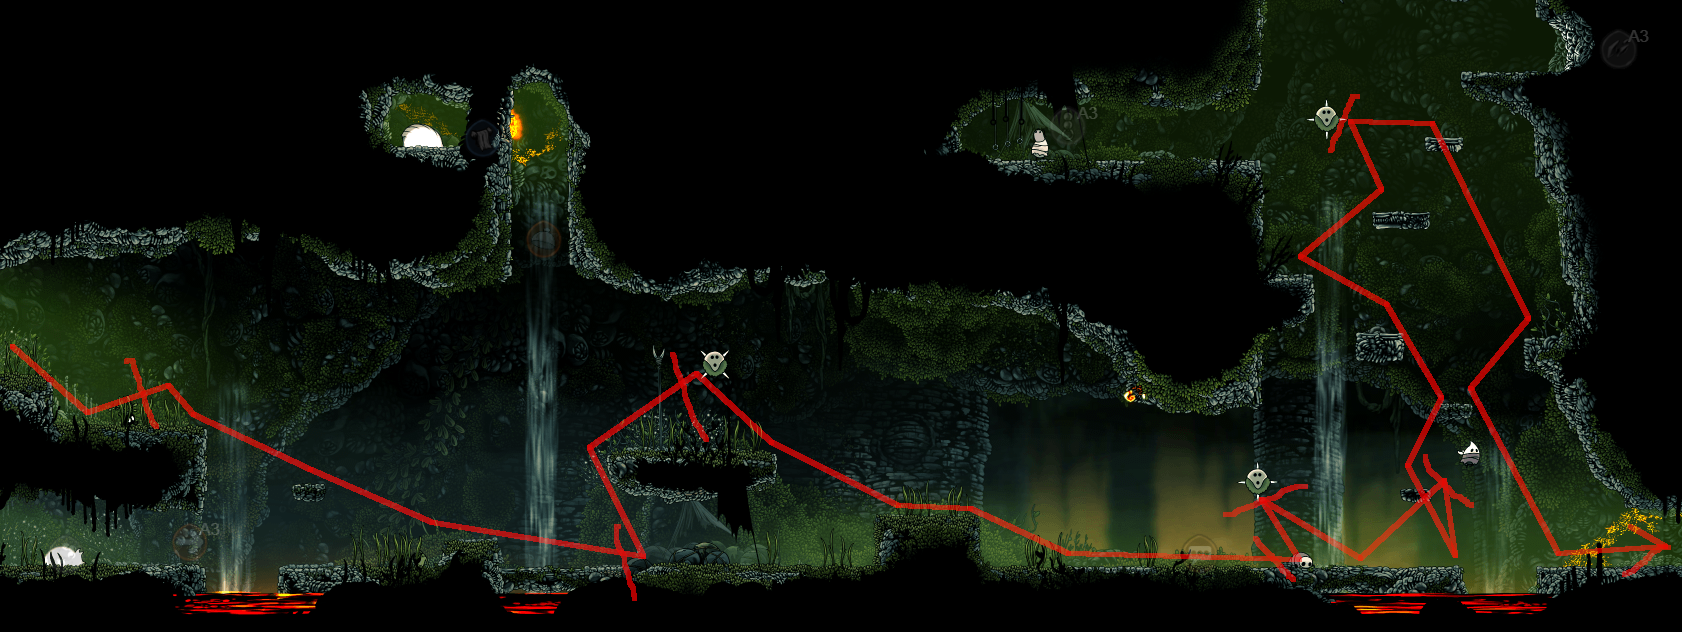
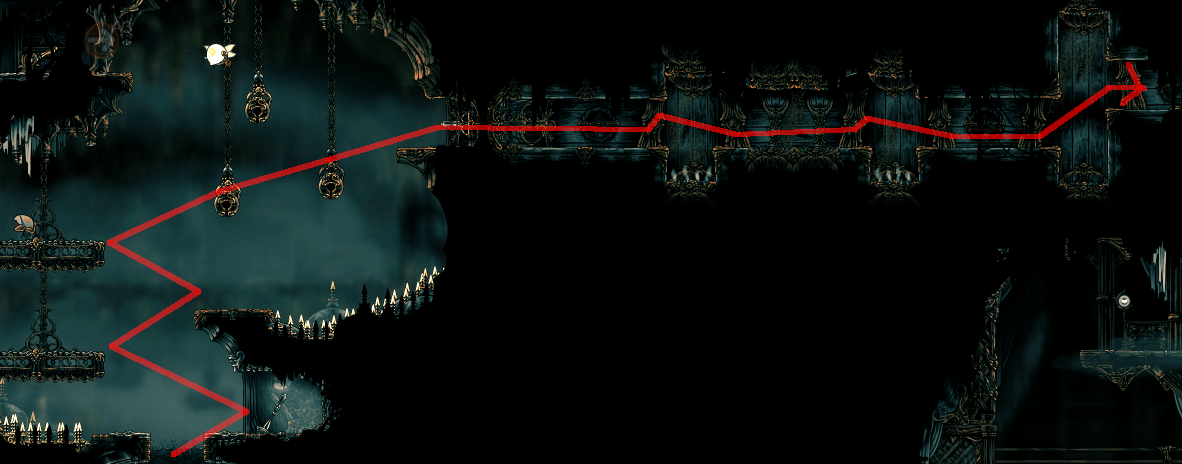
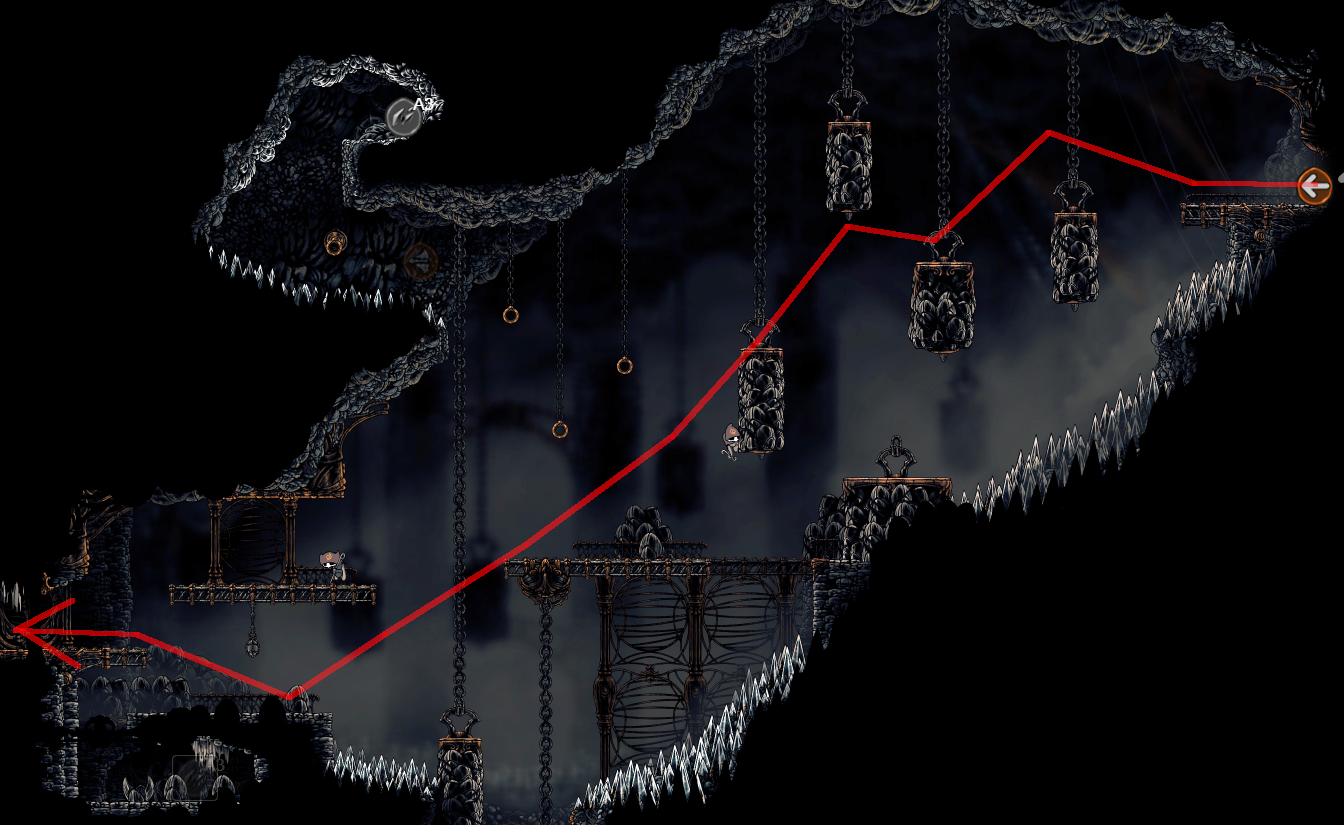
Make sure not to touch the crawler, then break the wall to grab rosaries, don’t stop to avoid falling rocks. Going back there will be a notorious skip I heard of and despite how annoying it can feel sometimes, it is simply so much faster and safer compared to going the whole way around. The beastfly skip is a necessity, and to perform it well will require a good feeling on the timings and positions.
First take aggro on the fly, then go up and kill the respawned crawler, do small hops while not getting too close so you can control the height of the beastfly before triggering its charge. The optimal height will be slightly above the chained metal fence in the background, stay close to trigger a second charge before the beastfly changes elevation and you should have enough time to do a clean pogo on it. Make sure to huge the ledge to climb.
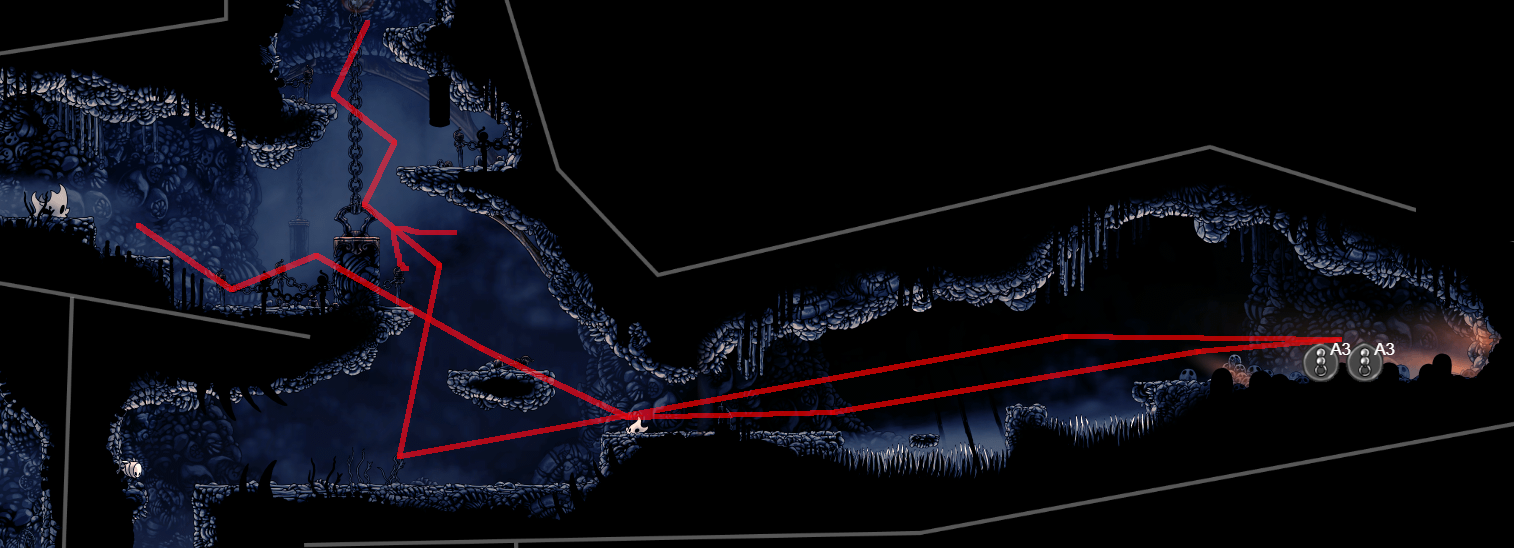
Hit the lever while passing, I like to hit it backwards so it pushes me forward and saving some time. Once again kill the crawler in the narrow passage, don’t take chances to be slightly faster on risky locations. Stand near the ledge while breaking the rosary stone to catch the spread. Ignore the enemies shown in the screenshot, they aren’t here at this time. Pass by Shakra.

This is where the first real tricky room happens. Move forward then stop at the background pillar so you’re at the right distance then jump with an immediate attack to parry the moss ball and climb away quickly, we don’t want to stay near those… If you go too fast the pilgrim might attack again instead of jumping back, and we don’t want to take that risk. For the second pilgrim, we take the opposite approach and rush with a jump attack to clear the moss ball and follow with 2 attacks to push it down, but be careful of the lingering moss ball. Hit the lever to save some time and proceed up.
Break the wall to get a precious relic, then continue, safely kill the jumping pilgrim on the path and avoid the spikes. In the house, you’ll want to hit the pilgrim twice through the floor so he jumps forward the trap, then cut the rope, and hit the second pilgrim through the floor, this will have both jump into the spikes for a simple clear. Gather the rosaries and get Silk Spear. Continue forward, break the silk strands with a spear, and hit the bugfly while falling down. The spikes should kill it, but wait to make sure before picking up the rosary string. Go down and get more rosaries, take revenge on the moss pilgrim with a spear then skip the rest of the room by staying above.
Time for the second boss of the run, Bell Beast. This one should be very easy, I never failed a run against her. I don’t bother following a strict pattern to skip the second phase, it’s too much trouble. When bells fall, just stay near the impact and they’ll always miss you. Just end the fight after that, always optimizing your punishes with spears when you have silk.
Charge: Punish when appearing, then pogo twice or spear after she passes.
Dive out: Punish once, or spear, then dodge the bells.
Jump: Punish when appearing, then hop attack twice, then all you can on landing.
Keep going, hit the lever and leave the room to skip the bell ringing, and continue.
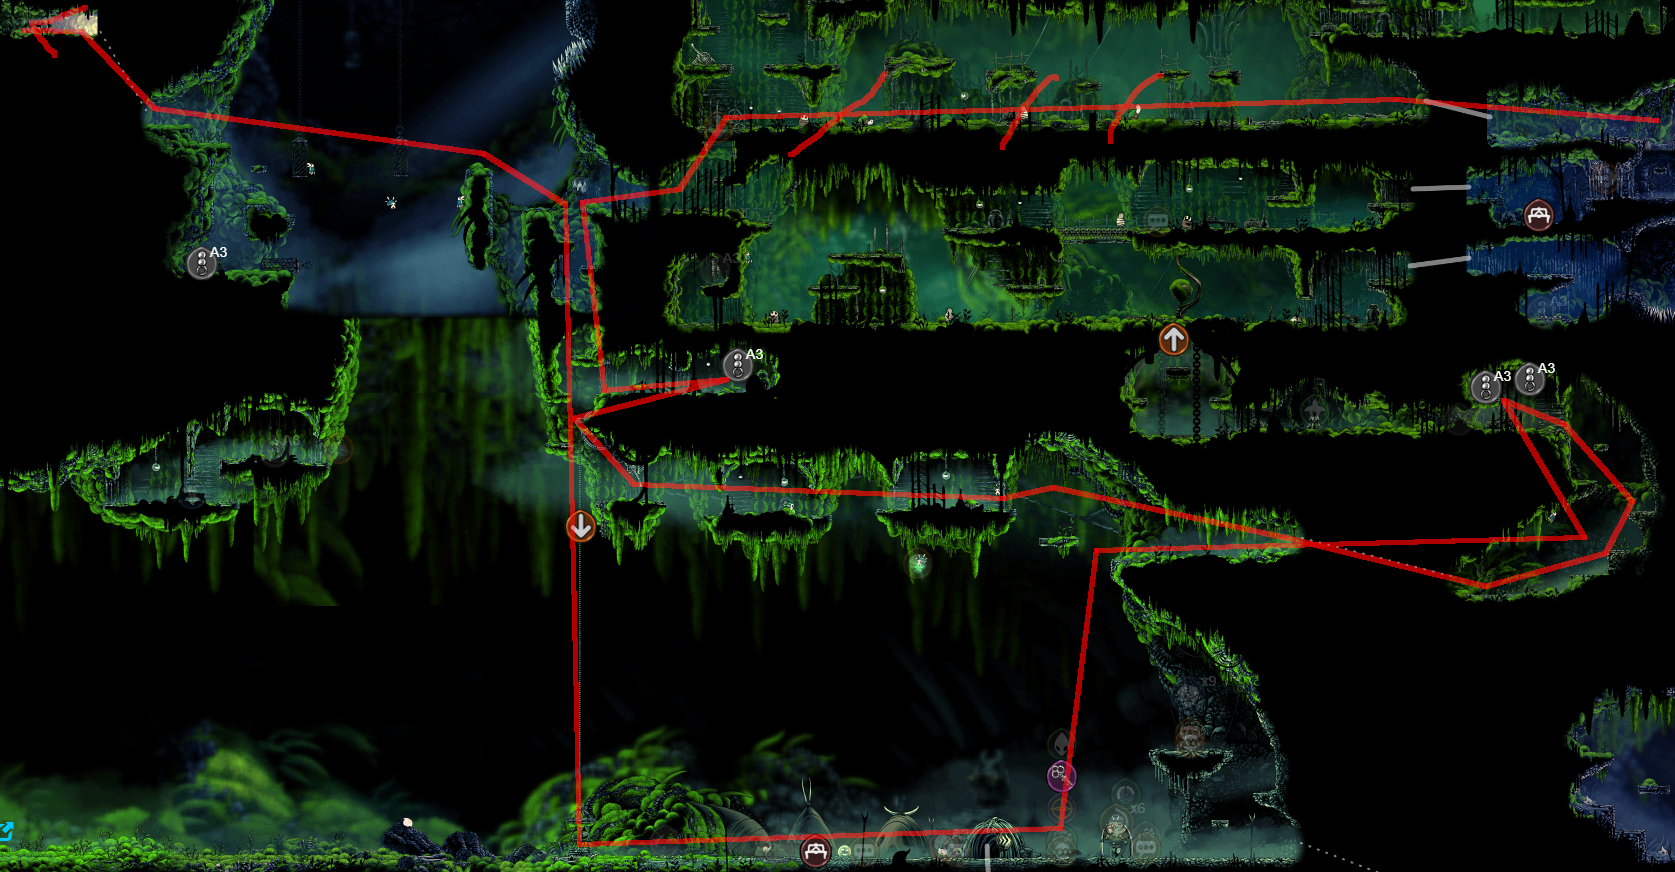
Deep Docks
We start by quickly killing the tall pilgrim, making sure to step back after the first hit and not move forward for the second two, or you risk getting hit. Then on the first crawler, if you have less than 5 silk, make sure to reach that amount, after that kill the second crawler to reach 8 silk. Don’t even bother fighting and throw two spears to kill the big crawler and leave the room with more rosaries. Don’t forget to also kill the flybug to get back to 4 silk.
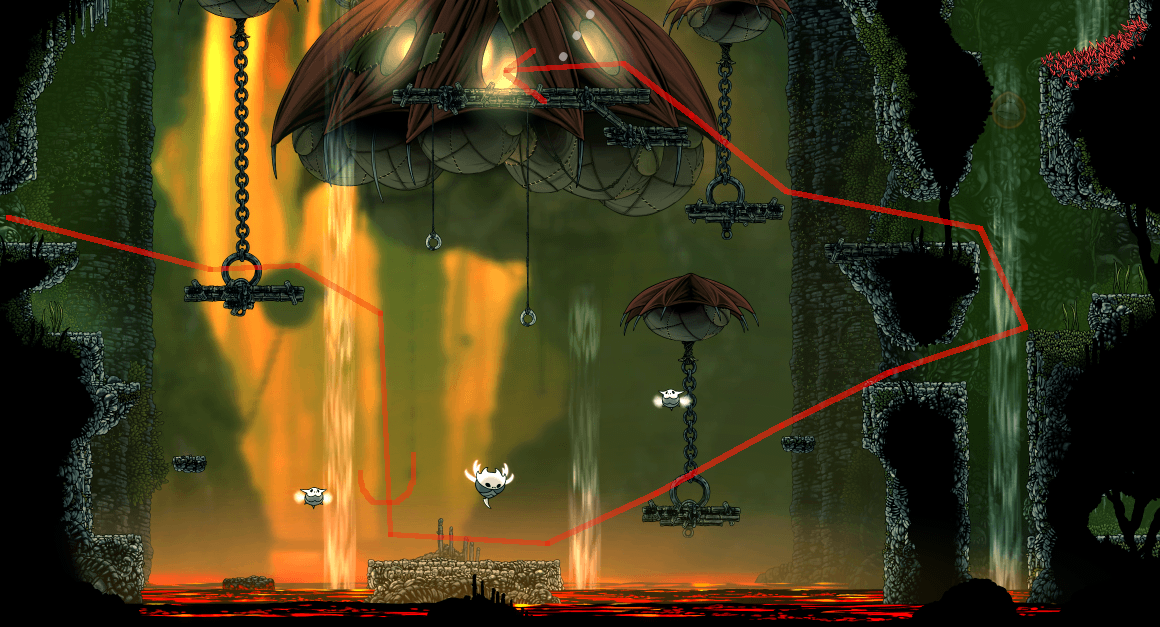
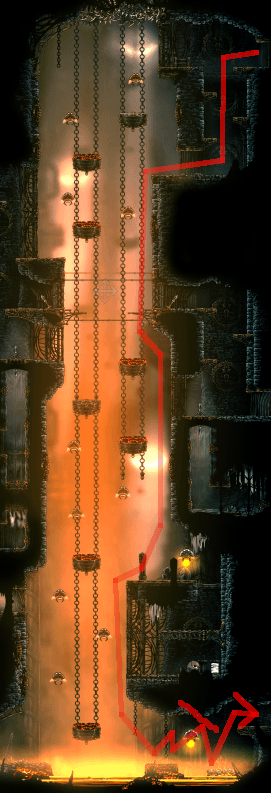
Try to hit the explosive while falling to gain some time then bounce back above the pilgrim to kill it while the explosion happens, leaving you at 7 silk. Then hit the spinebug once to reach 8 silk and finish it with a spear. To gain time use a second spear to hit the explosive from afar and wait safely until the path is open to grab the mineral. Climb up the red fruits, make sure to kill the two fly bugs because they are too erratic to take any risks. Ignore the third and enter the top room, throw a spear at mid height to hit both the rosaries string and the door.
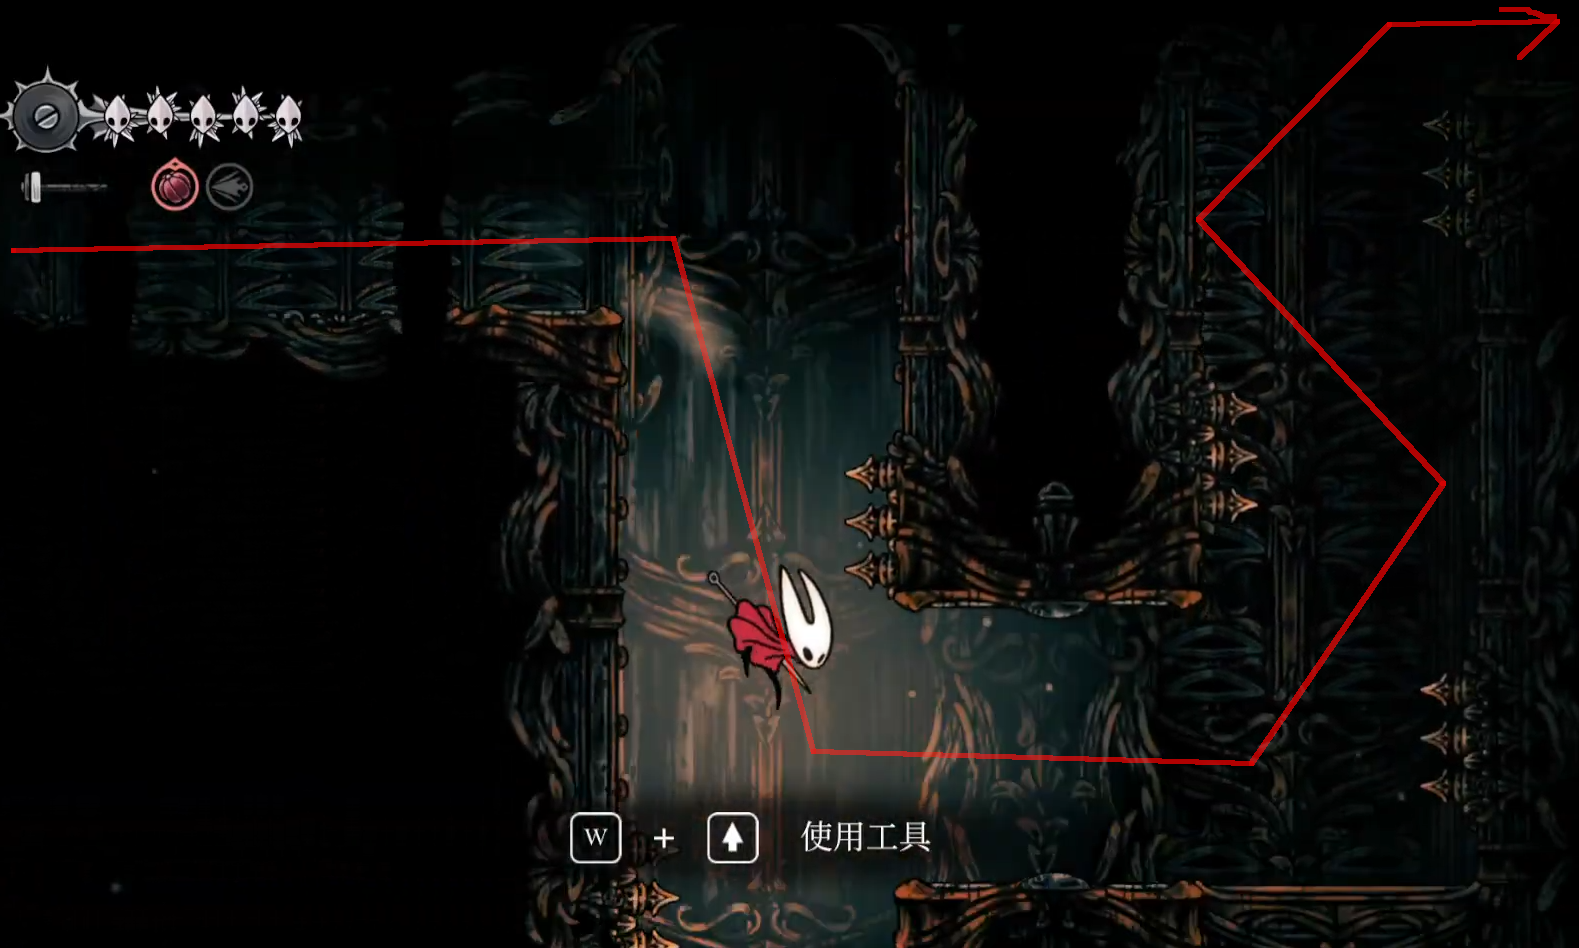
Perform the pogo well, just wait for your angle to be just right and do it close enough to take no risks. Get a ton more rosaries, if you manage you can even do a pogo to open the chest while falling down. Leave the same way, honestly this room has never been failed during my tries, once you get a feel for it there’s no reason to fail.
When making the jump to the bell room, make sure to pogo at the apex or you won’t reach the ledge and fall. Don’t forget the rosary rocks hidden and continue down. There was a time where I would fight the ant guard, but I found just enough rosary sources that it made entering Hunter’s March not worth the trouble, though for longer runs it’ll be a necessity, any% can afford to skip it.
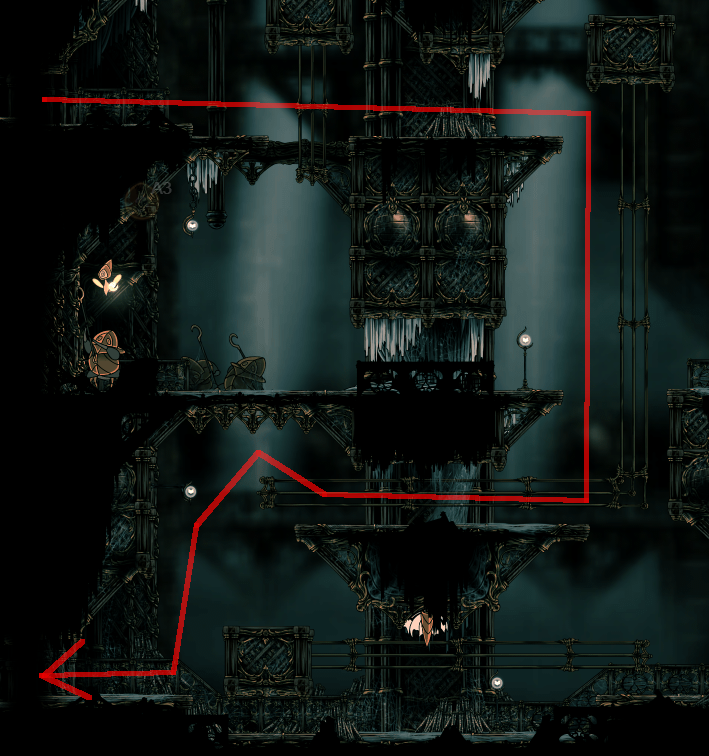
With two pogos you can skip the platforming with spikes, then enter the large room with lava. Get the rosaries to the left side, then kill the 2 crawlers in the passage without rushing. Fall against the claw wall and wait a bit before doing a pogo to reach the bottom platform and skip some troublesome fighting. Use a spear and finish the bell worker before entering deep docks proper, we don’t want to be fighting those too close for long.
After a long walk, climb up in the Shakra room and steal a quick hit on the tall bell worker followed by an instant spear to neuter it. Basic platforming leads you to the next room.
Dodge the first crawler then kill the hopbug, they are nasty and never take risks in narrow passages with those. Steal a hit on the flybug while jumping, dodge the second hopbug and pogo off the big crawler to cap silk. Avoid the third hopbug and throw a spear on the fourth one, finished with another strike, this is an annoying enemy situation otherwise. Climb up after the path opens.

This room requires a specific timing but that makes it so scripted I don’t even look at what’s happening, only performing the actions. First climb up the platforms starting from the right side, avoid jumping when grabbing the ledge of the last floating platforms. When reaching the flying ant hit it once, wait until it comes close and hit it again, immediately jump right and hit the ant before jumping above it and exiting the room. Here comes the first arena, if you followed the exact steps your silk should be full.
1: Initiate with a spear and wait, hit the ant rogue twice when it comes back up then immediately do a jump into pogo to counter any move possible and finish it.
2: Pay attention to which side will spawn an ant first by the dust clouds, throw a spear and finish it before the other spawns so you can safely attack it.
3: Do the same for the next wave, jumping first. To make sure the last flying ant doesn’t charge at you, do quick consecutive kiting jump attacks.
4: When the ant rogue spawns, throw two spears at it and hit the flying ant twice before moving to the side to dodge the charge and finish the battle.
Let yourself fall and hit the flying ant once before throwing a spear to kill it and open the wall. Kite the second flying ant twice (if you follow the steps you’ll be missing 2 silk then) and throw a spear to safely grab the rosary string. Let yourself fall and pogo to skip the platforming near the flying ant and reach the Dash upgrade. Now that you have it, you can destroy your fingers by wavedashing at every flat ground opportunity. When leaving throw a spear and finish the bell worker with a dash strike. Go down to the fast travel, break the wall to quickly skip the animation, taunt to call the beast early and leave for Mosshome. Use your stashed rosary strings in advance to gain some time.

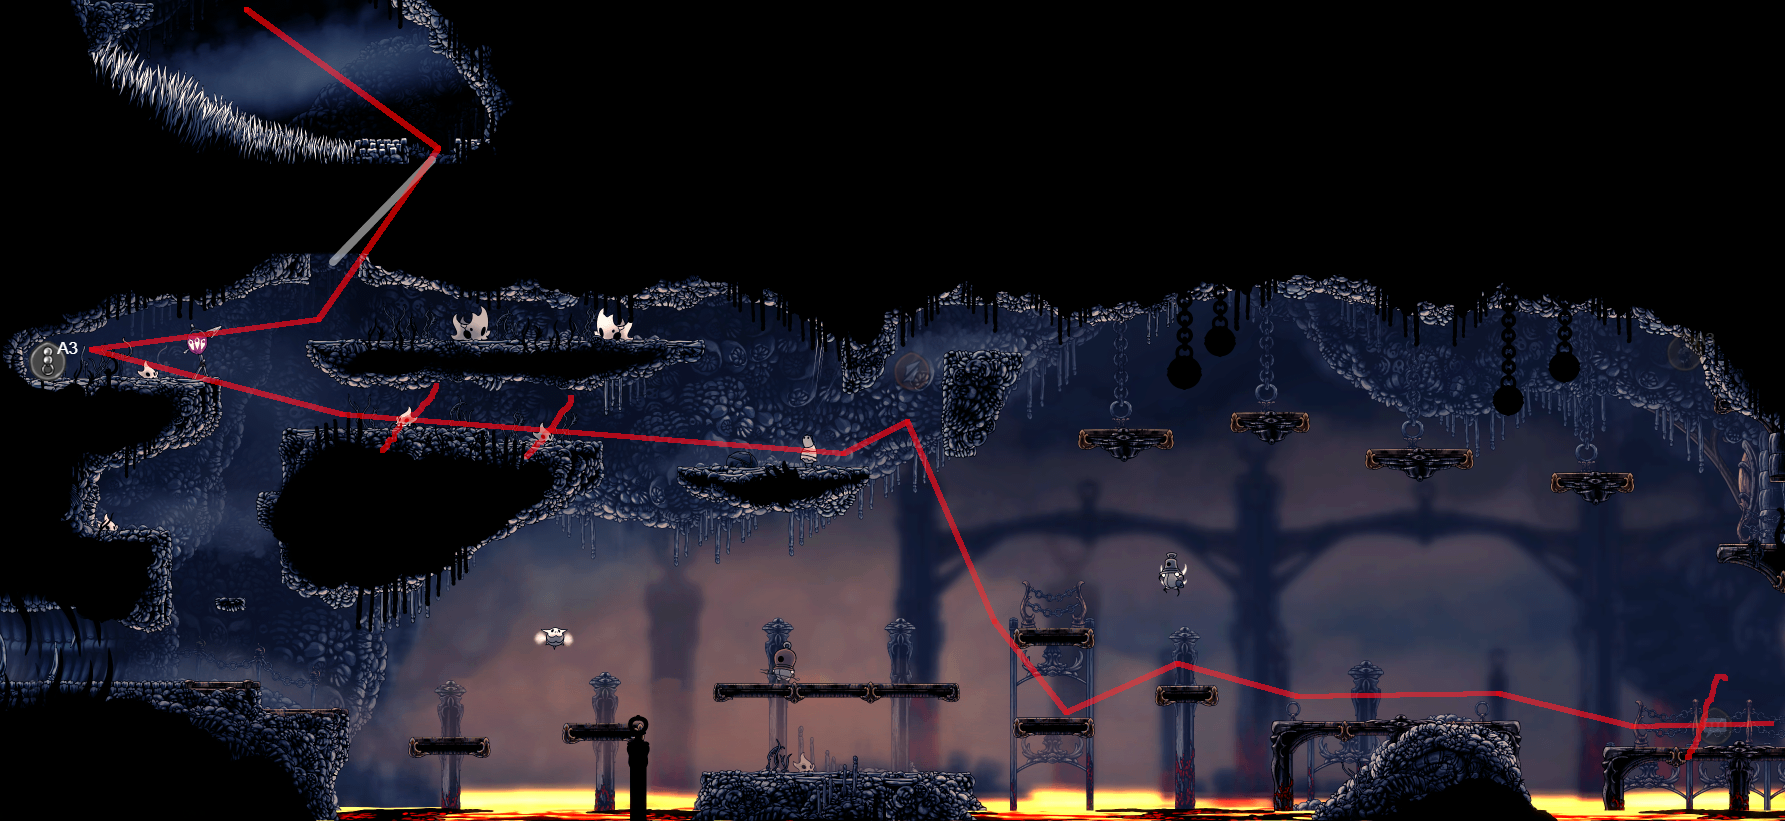
Wormways
Take revenge on the moss pilgrim with a spear, then dispatch the tall pilgrim regularly to throw another spear on the last one. Fall down and directly go to the rosaries near the elevator, hit the lever and run to the right avoiding the bugs. Don’t jump too high in the room to reduce aggro and grab the last rosaries needed while being careful of the traps (If you’re just short of 500 open the wall and kill a pilgrim or two quickly). Fall down to the shop, buy the precious key and go back up with the elevator.
Wait a bit for the fly to go farther and jump to the next room. Wavedash or spam dash to the end, enter wormways.
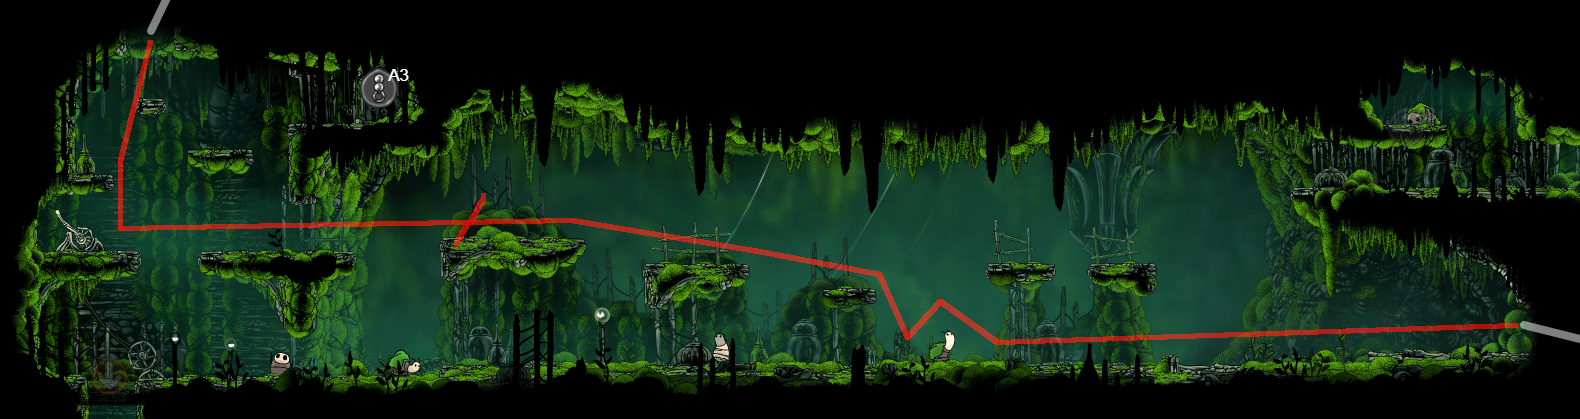
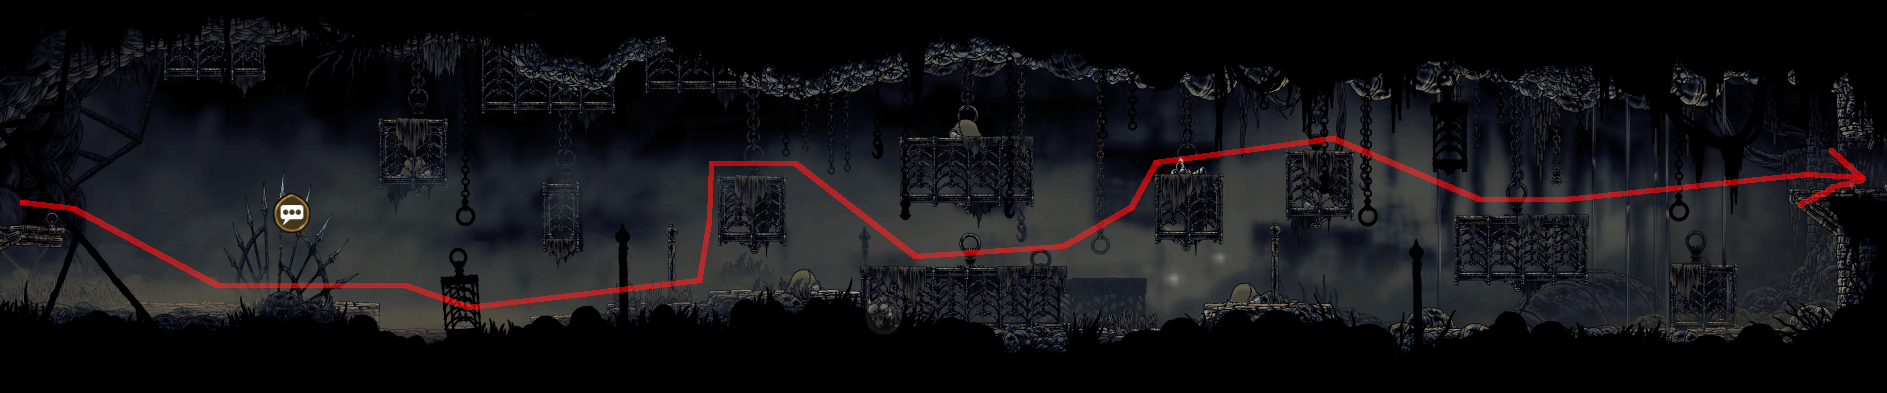
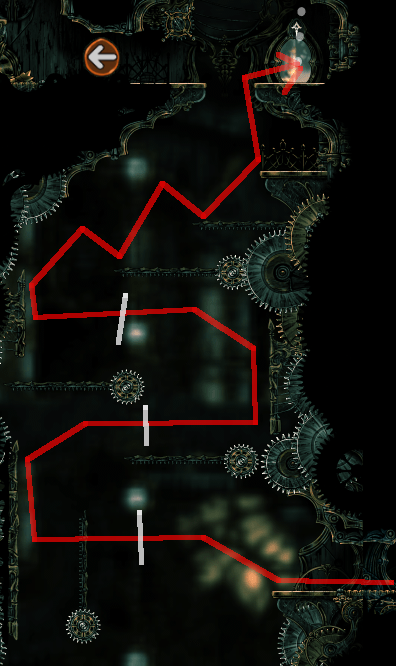
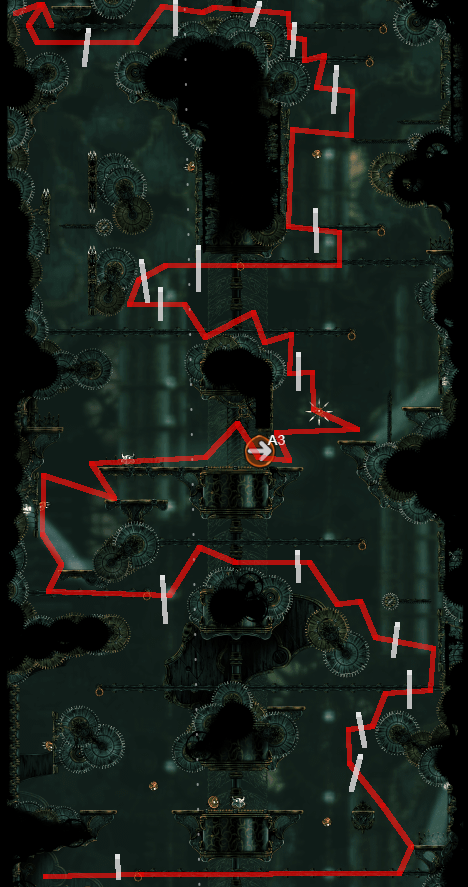
This area is a lot more scary-looking than it really is dangerous. TO safely pass falling worms, wait until they dig the ground, do a small hop and dash. Always pay attention to the incoming one, if it is on your path, stop first, otherwise dash forward as you can. Take your time and this area is a safe stroll. If the small worm appears in front of you on the large platform, wait a bit and jump above, quickly leaving.
On the first tricky climb, really take your time to have the right timing and be very careful of not hitting your head on the small notch, making you fail the jump and potentially getting hit. Do this twice and leave the mean part. Next are two small worm spawn points, advance until you can hop in the tunnel and dodge both calmly. Another tricky ledge climb, be mindful of where the small worm spawns, if it appears on the next platform but close, fall back and keep hitting it until it burrows, if it’s far, simply time one hit so it falls in the pit (on failure, do as said previously).
In the tall room, jump to reach the platform and let yourself fall then dash to skip any fighting. Leisurely go through the rest of the area.
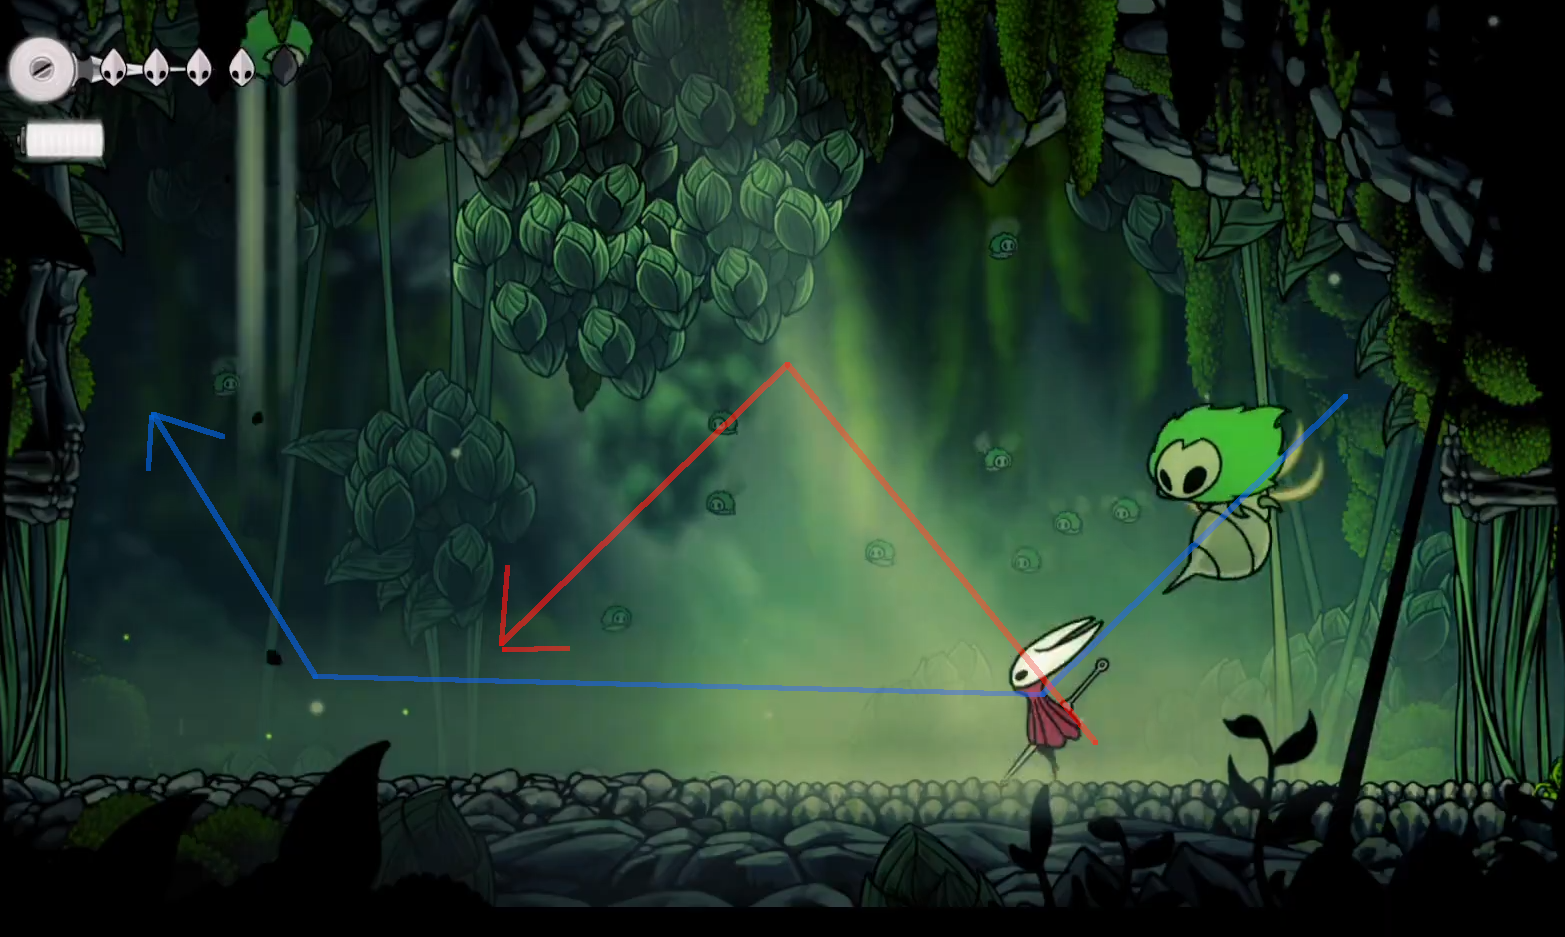
Quickly climb the platforms and on the last one, taunt the flybug so it gets close enough, pogo off of it and reach the next room. Enter Shellwood.
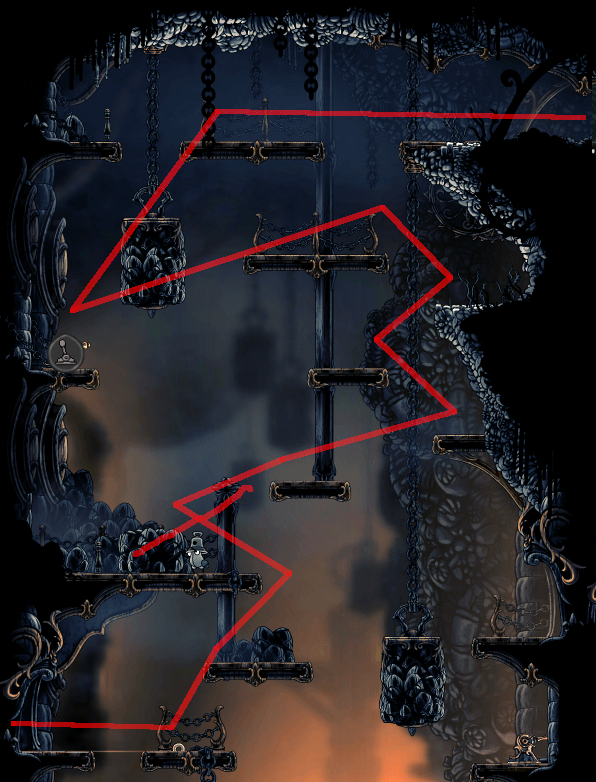
Shellwood
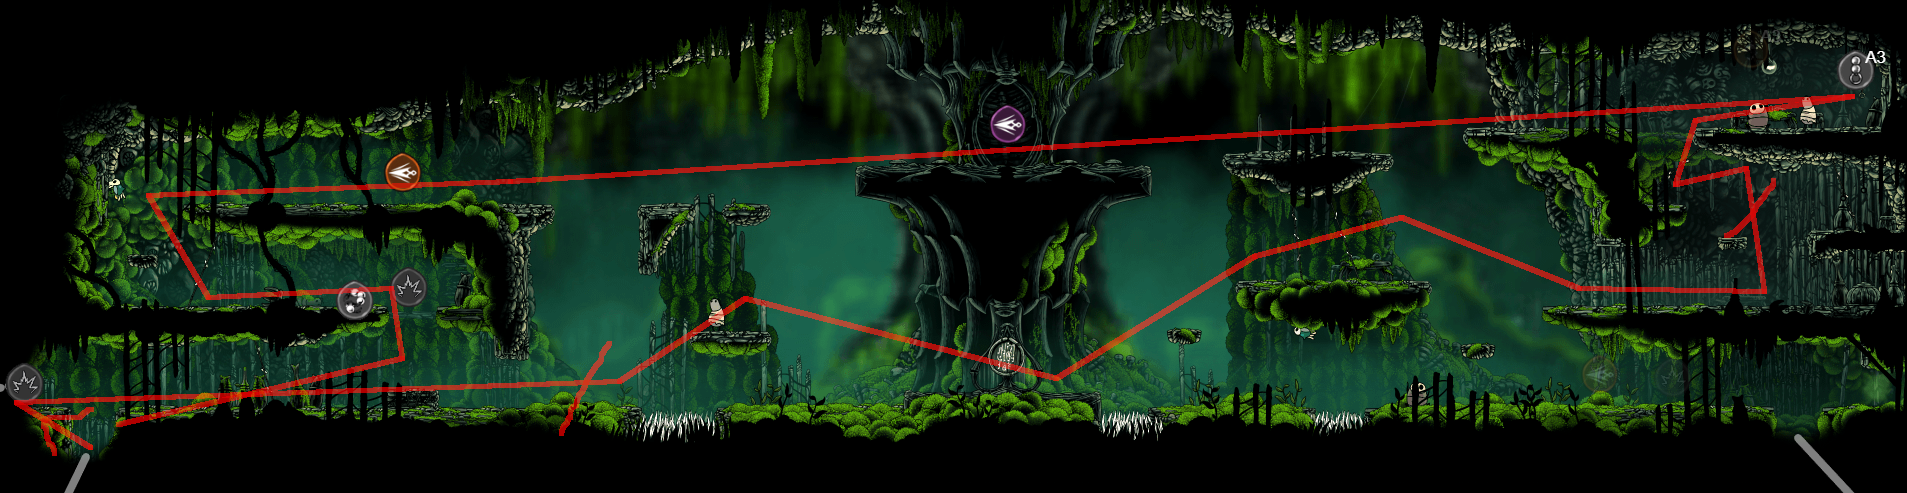
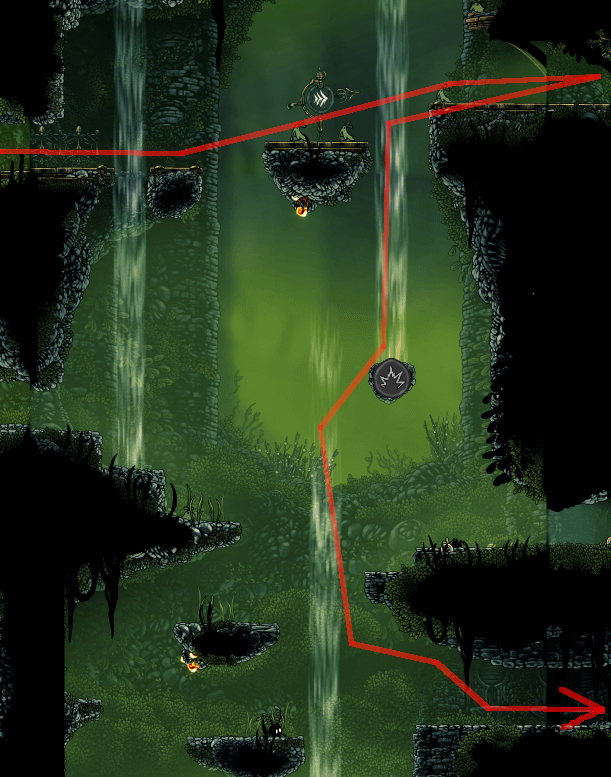
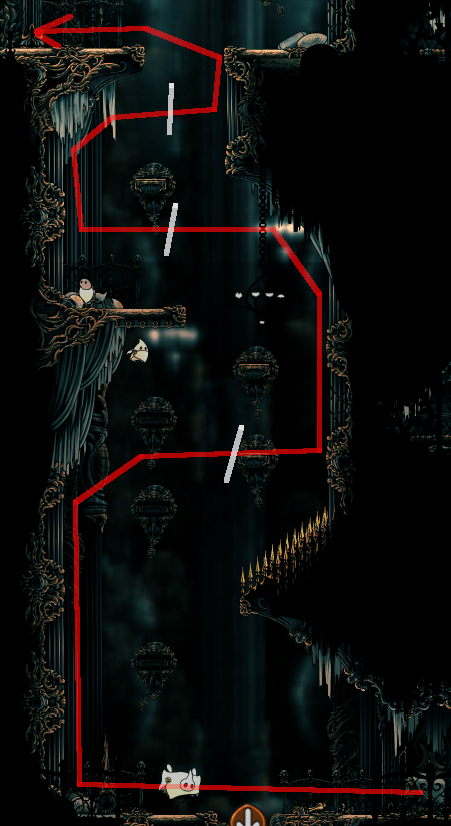
The first hunter is sleeping, let’s not wake him up and sneak under. Be very careful of where the waterskipper is going to move next, don’t rush it or you might collide from offscreen. On the second hunter, wait a bit to see where the waterskippers are, and after the hunter kills one or misses, go forward and if it’s all safe, rush to the exit.

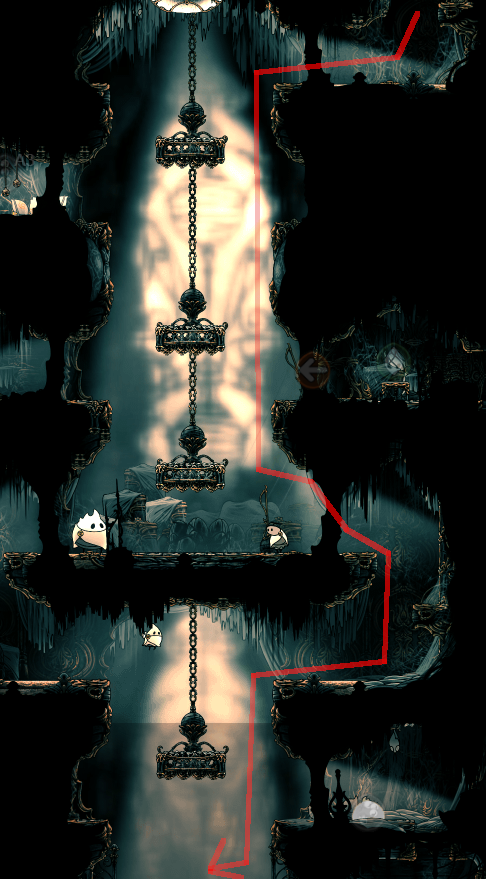
Pogo up, always keep down pressed so you don’t fail one, quickly hop to the top of the room. It’s time for another skip I heard of, and is too essential to not use. Taunt four times on the platform, when the flower is close enough, fall and taunt three more times, go farther and taunt three more times, then jump above it and wait until it attacked to taunt a last time. Use the black vines in the foreground to know when to pogo on the flower as it floats back up, when the flower is at the second horizontal vine, go.
Pogo on the next flower to reach the branch and quickly continue. When you reach the wallflower take your time to kill it safely then proceed. Don’t miss the pogo.
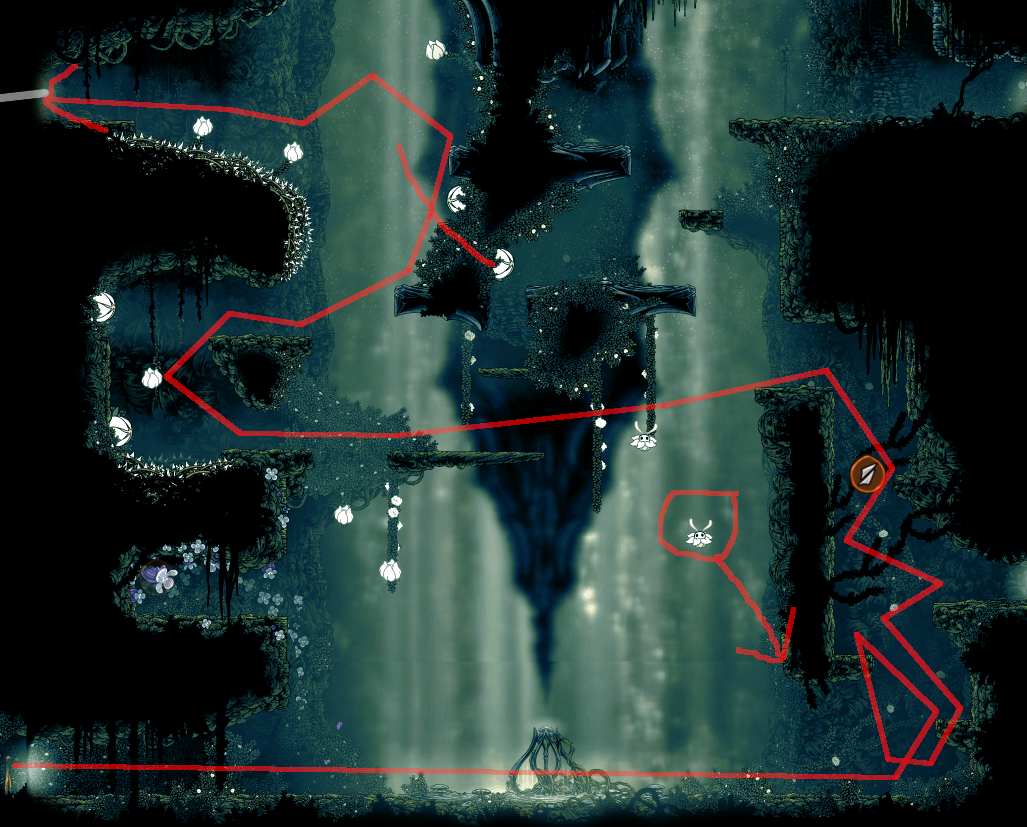
Nothing special here, just never stop and do the right movements and hops to avoid any risk. Get the climb and fall to the left, leave to the right. Nothing happens on the path, use a spear to kill the flower from afar to be safe, reach Bellhart from above. With the right timing you can instantly destroy the bell walls.

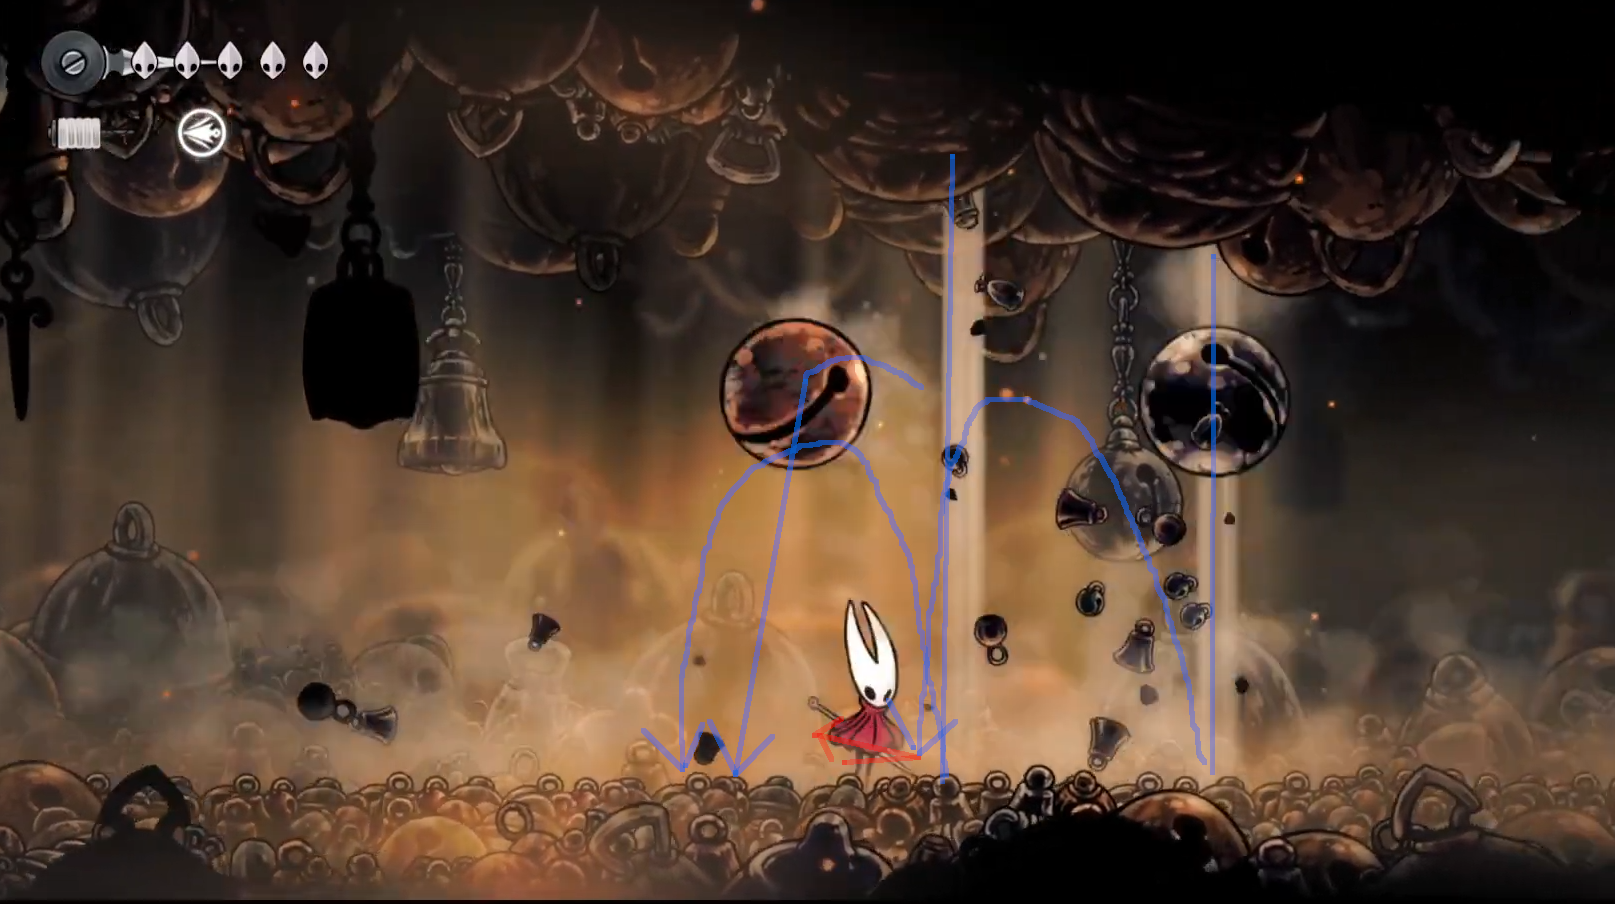
Rush forward, jump the pit, when you fall be careful of where the spiderbell will spawn, if it spawns under you quickly dash and wail on it(be very careful as after the first jump it will keep attacking and you can only hit it once safely each time), otherwise move to the edge and wait for the big bellbug to fly down. Slide down the wall, wait until it goes back up and slide down until reaching Widow.
This is arguably one of the most difficult part of the run to consistently clear. Skip the intro with a taunt then start with a spear after her scream. The way I safely deal with her attacks is I wait after she teleports to see the angle of her next attack, then dash and wail on her if it’s safe, otherwise I position better. Avoid staying near the walls, but if it happens and a diagonal bell comes, hug the wall as the bell will likely rebound on it. When she’s stunned, steal 2 hits and a spear. Keep the spears going and punish patiently until next phase.
Vertical bell: Don’t stand under it, very easy to punish if it’s not on her. Be careful of being trapped when it’s 3 in a row.
Diagonal bell: Either be confident you can bounce it back, or jump and dash above it, if it aims before or above you, don’t move. Get a good feel of the angle trajectory to decide before acting.
Crawl: When she crawls, pogo then wait until the second bell strike happens to pogo on it.
Charge: When she strikes down, you can easily jump above and quickly spear, or pogo if you lack silk.
Bell falls: Don’t stand under it. DO NOT throw a spear or they’ll go flying everywhere.
For the second part, wait a bit then walk back to gain more distance when she reappears. Steal another spear after the scream then be ready to jump above a charge, or position to dodge bells. Be mindful that her patterns will always cycle back to a charge, it goes 1-3 bell attacks(max 2 of the same type), then 1 charge, repeat. It is only safe to rush her after a charge, or when she’s still preparing a bell attack you can safely avoid. Do it very patiently and you’ll never get hit, spear her to death and enjoy the major milestone of your run cleared.
Charge: Keep an eye out, it will always come out at some point. Jump and do a back pogo to punish her charge.
Bell falls: Just don’t stand under it, however be careful of very slight deviations on rebound.
Diagonal bells: Be most careful of the trajectories, always stay in the middle of the room and either bounce the second bell, or jump dash above it. A simpler way is to make sure the first won’t hit you then throw a spear to punish and block the second bell at once.
Be careful not to slip in the dream, take your time and use the wallrun for better precision. If you fall, you fail.
You can quit to menu to skip the bell ringing, then reach Bellhart proper. Skip to the relic buyer, quickly open the inventory to remove the title card and enter the house, give your relic to gain rosaries, then upgrade your needle in the next house. Fall down and open the fast travel then leave to Greymoor.
Greymoor
Say hi to the missing Moorwing, then be careful of the bear trap. Rush forward, with the right timing the flying mite should be away and cut down the rope. Go under the other flying mite, hop above the ground mite, hit the trap, proceed. Hit the last trap to be safe and exit.

Jump dash above the silk gatherer and climb the tower, wait a bit and pogo on the spinning spikes, enter left. Wavedash to the end of the path and enter left to the reaper chapel. Safely climb to the left, wait a bit and pogo to the arena.
1: Kill the first silk cutter as you like, don’t rush it and it’s easy.
2: Spear the right silk catcher when they spawn then safely kite the second one.
3: Be very careful when dealing with the silk raker, always kite and mind when it burrows, also the hitbox is huge and can hit you if you’re too careless.
4: For the last wave, wait left, hit once then spear both cutters at once, then finish it.
Obtain the reaper crest. This is an essential part of my run, because the range and moveset of this crest is the safest by far(except for shaman) and I’m way more proficient with it than other crests, reducing a lot the risk of getting hit. While you do lose some dps, the difference is not that significant and doesn’t compare to the safety gained, and it makes a lot of platforming much easier. Now leave from the way you came from, at the top of the outside room, steal a hit then spear the cutter to leave.
Back in the tower, go up then left again, proceed and spear the silk catcher. Climb up to craft the only red tool of the run, yet essential, the Pimpillo. Leave back, drop down in the tower to safely climb the other side and take your time until the raker charges you to jump above it. Reach the outside and quickly parkour to Sinner’s Road.
Sinner’s Road
Skip Lace yapping, then parkour through the first room. Run then climb the first cage, fall from it onto another then climb the next and keep running on top until the end.
Run right, pass under the first cage then climb the next, enter the big one then keep on top, until the last one then the trick here is to dash from the cage into the curved roof so it makes you fall right next to the roach then fall down and grab the Barbed Bracelet, the other important tool of this run. Go back up and follow the path in reverse.
Go up and enter the room of doom, except we have a secret technique to skip most of it. Climb then pogo on the wretch, if it keeps floating up(if it doesn’t, you could risk it by going right, or reset the room), pogo 5 times to reach the platform, wait until the mite jumps then proceed. Quickly hit the bolas wretch then spear it(if it’s high enough, run under and leave), if you’re too slow you expose yourself to pain. In the worst case, make use of the reaper windshield(regular attack) for protection. Do the regular path like a stroll so you don’t aggro the enemy.
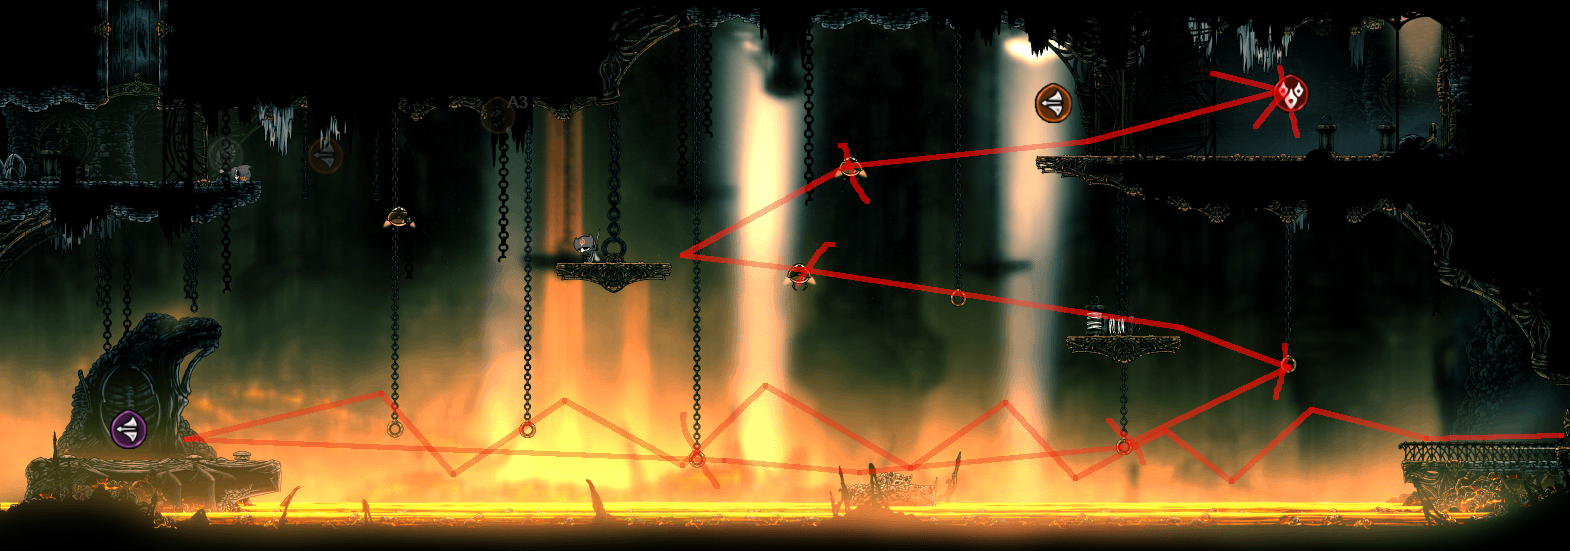
Here comes a difficult… wait, I’m getting news, apparently this is an easy room? Yeah, thanks to the reaper secret technique, we can skip most of the danger, make use of the reaper lunge! Start by doing a long jump and pogo on the second cross to reach the first cage. Then wait until the cross stops near you to jump and dash, pogo on it then dash and reach the second cage. Finally the supposedly hardest part, wait until the cross is far to jump and dash, then pogo in the air (you have to miss) and lunge(dash again) to cross the whole distance safely.
You can also just swim through the maggots and avoid all this. But this is uncool (and being mucked is annoying to cross the mist easily).
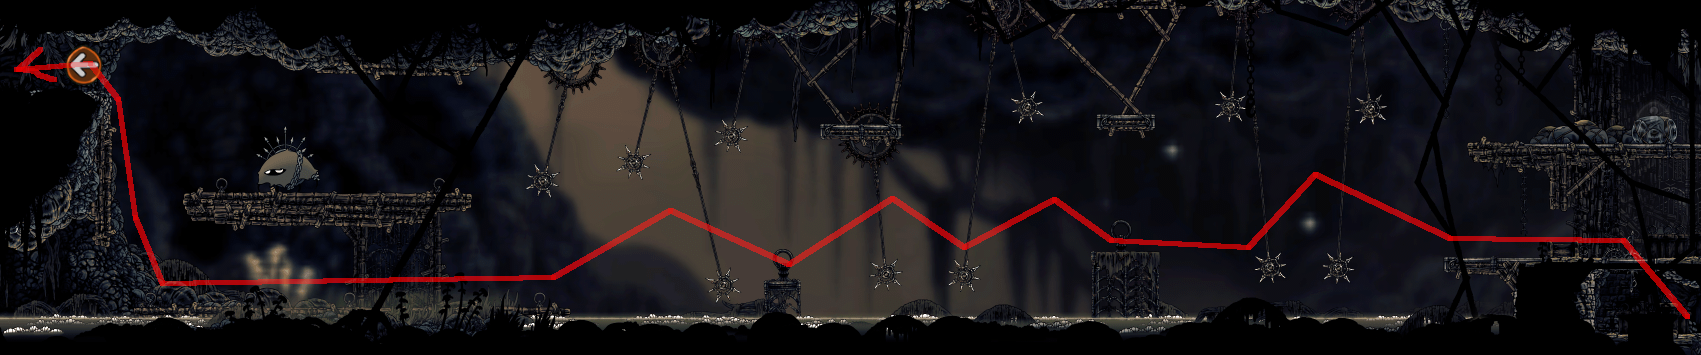
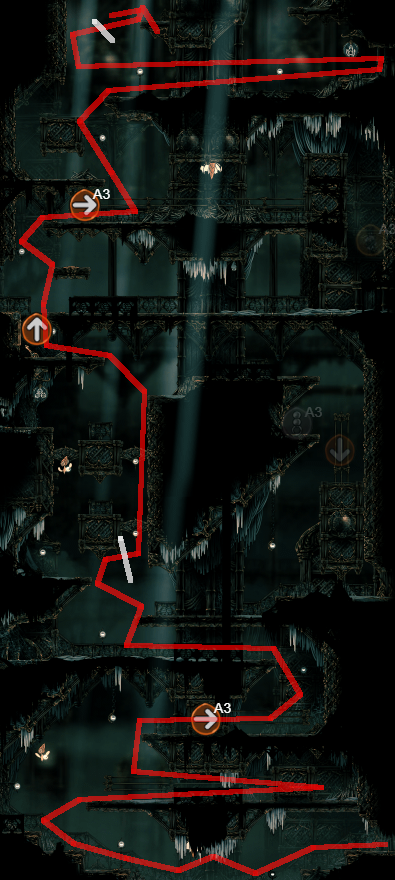
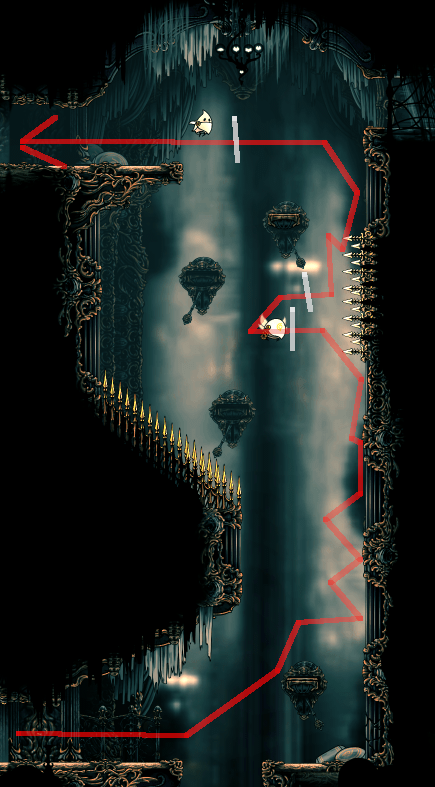
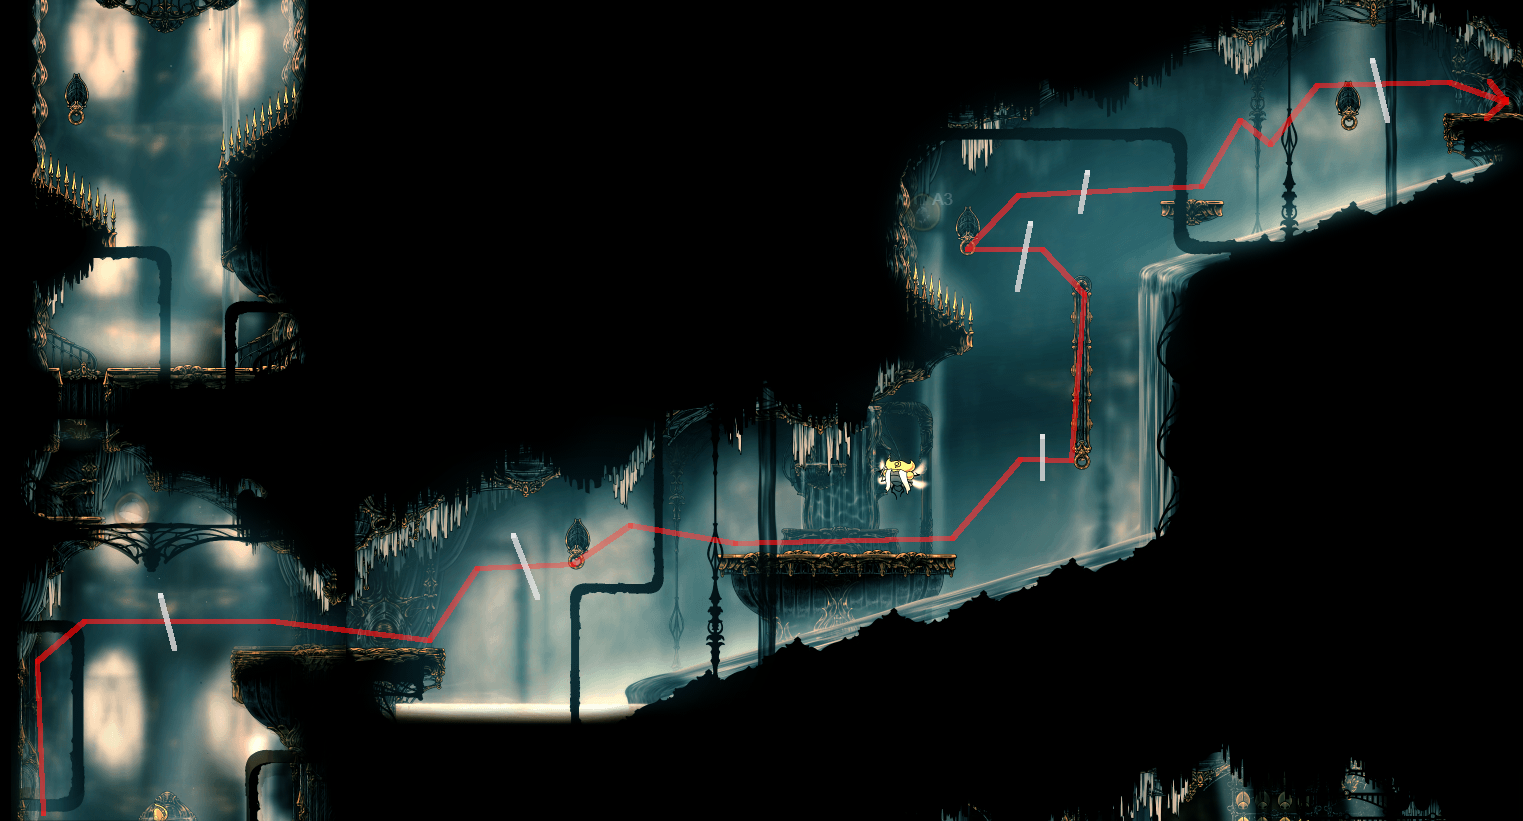
It’s time for the mist. There is no easy solution to this place, you will have to learn and become familiar with the rooms. Know the basic rules of the first two rooms being random, then take any horizontal exit in the third. Fourth is random again, and the last one is always on the right (but be careful of rooms with two right exits). Proceed very carefully, pay attention both above and under you, check for pressure plates and always dash away when you hear something above. If you aggro a ghost, kill it instead of rushing, unless you 100% know the exit is near with no obstacles inbetween. Never ever do blind jumps, however you have the reaper pogo that allows you to stop momentum so you can afford some falls if you stop in advance to react if there’s any trap under you, but only ever do that if you’re confident.
Rushing is how you fail the mist.
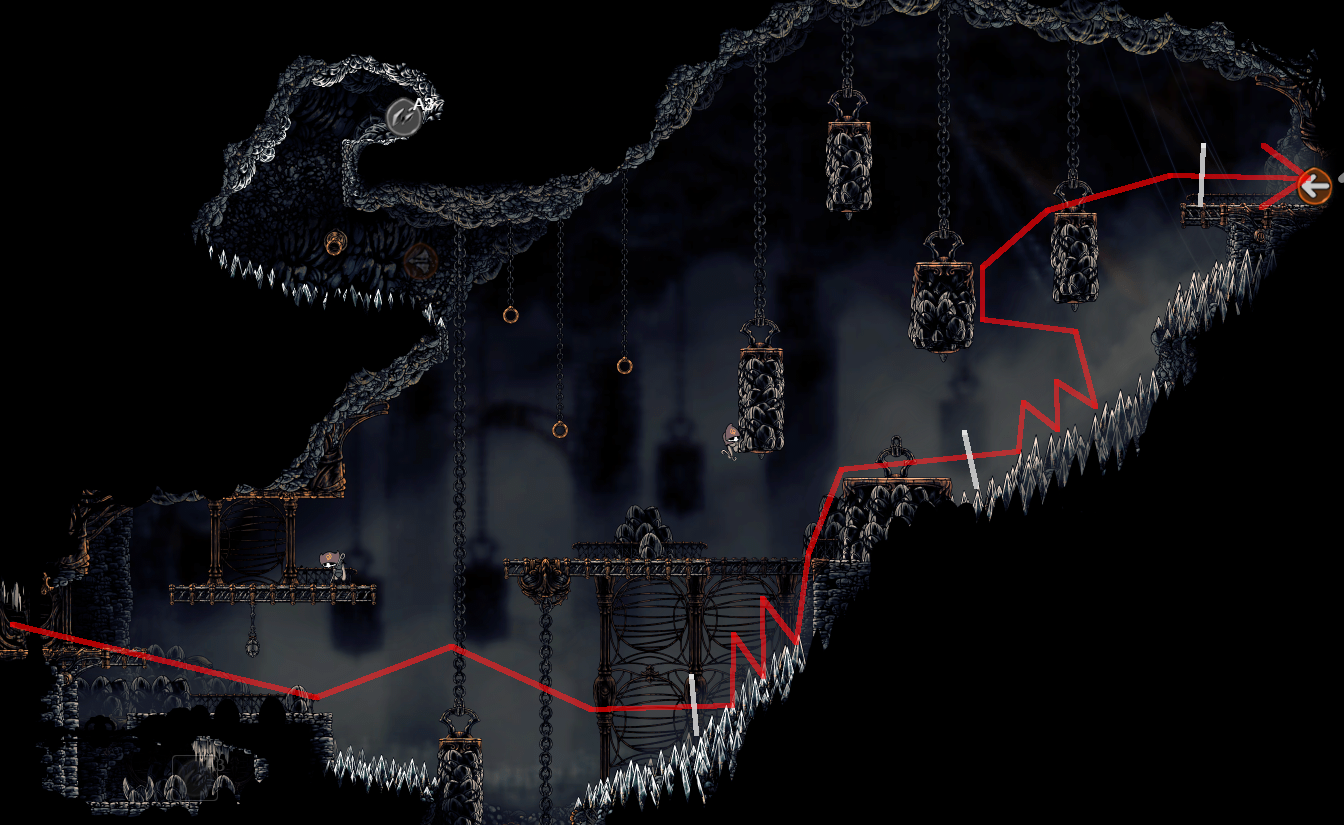
When you enter the Exhaust Organ, run and make a stop at the webbed bench to equip both tools you obtained (and remove maggots if you ever fell). Run past the drapemite and wait. You do not want to rush an organ pipe segment, it is very easy to fail your run if your timing is just a little offset. Right when the vapor clears, hop dash to the wall and climb quickly to the ledge. Wait a bit and perform the same again and wall jump to avoid the spikes.
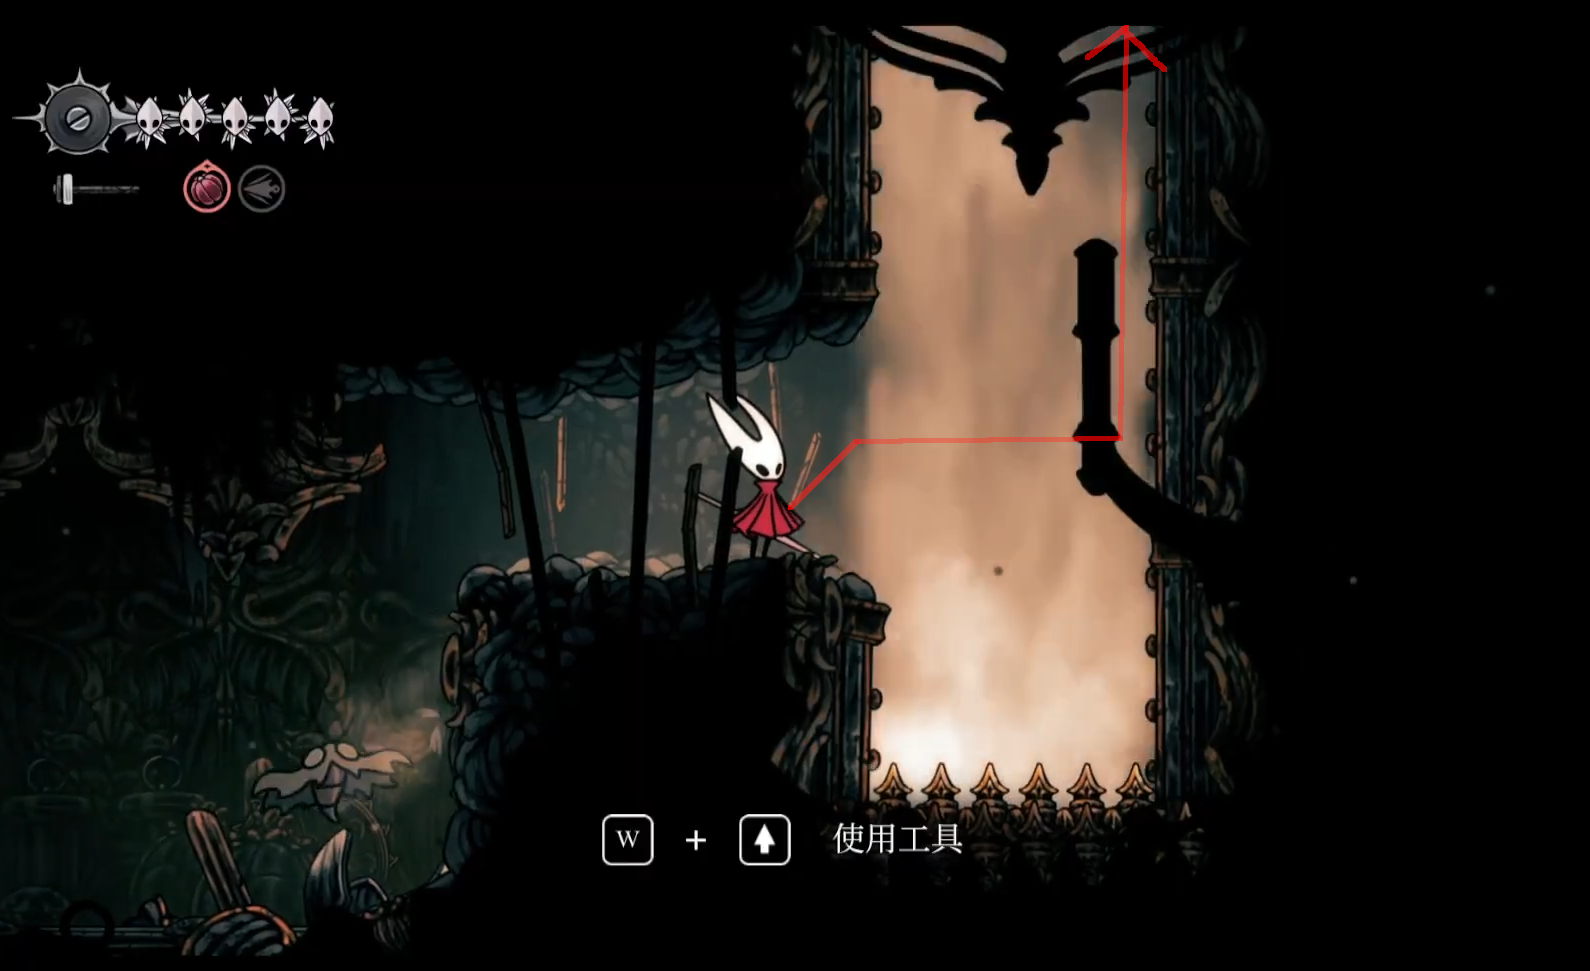
Contrary to before, the actions to reach here should leave you the perfect timing to keep going safely so do not stop for a second. Hop dash to the wall and jump again, then freefall between the spikes with a well timed dash to leave this part.
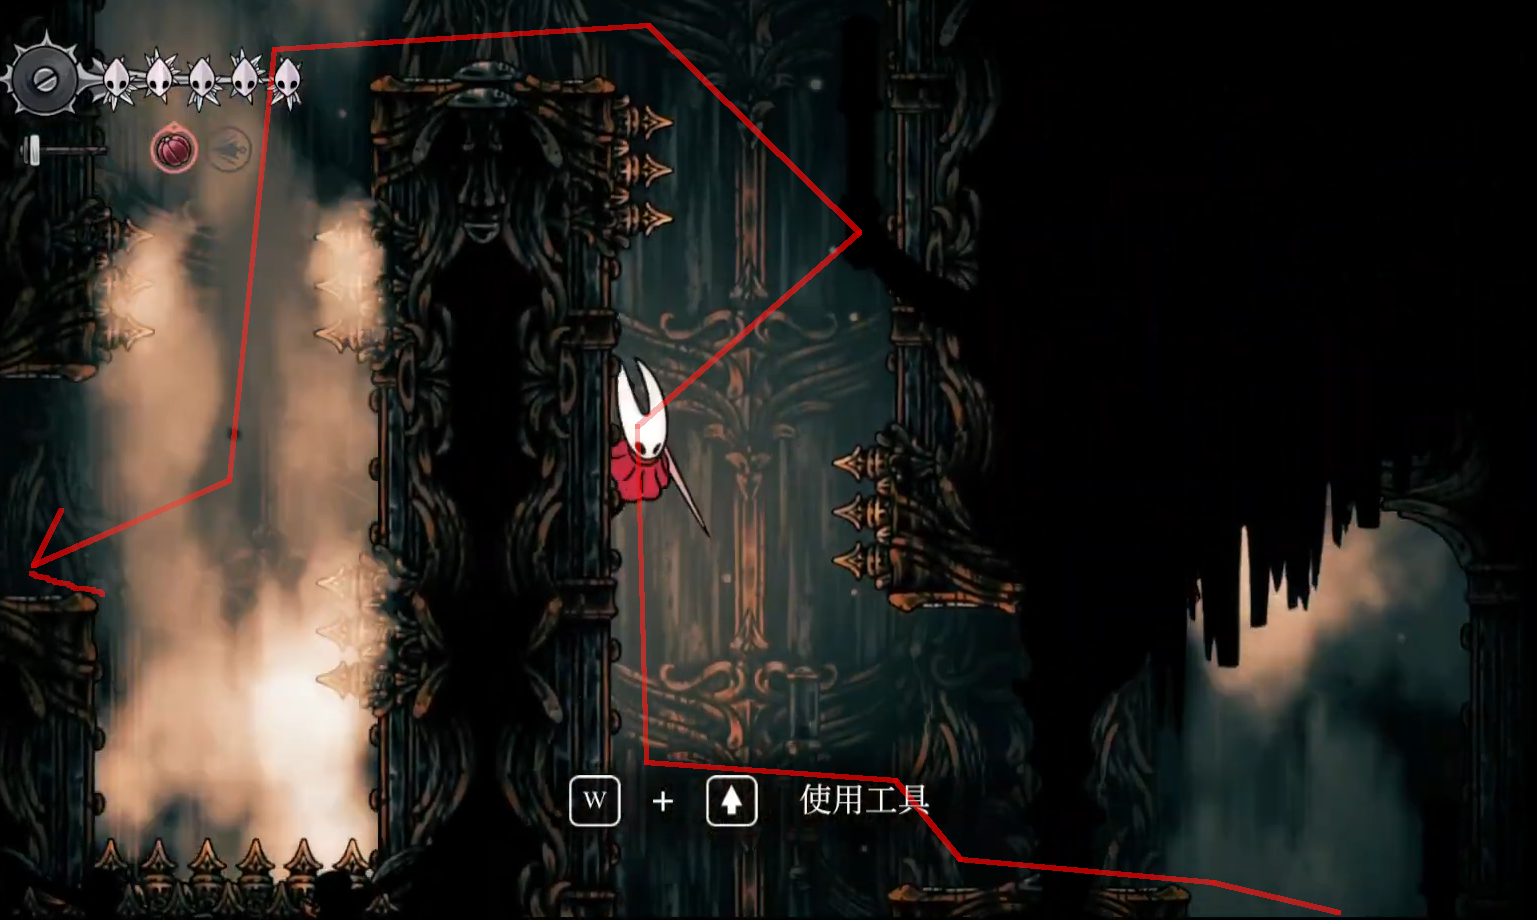
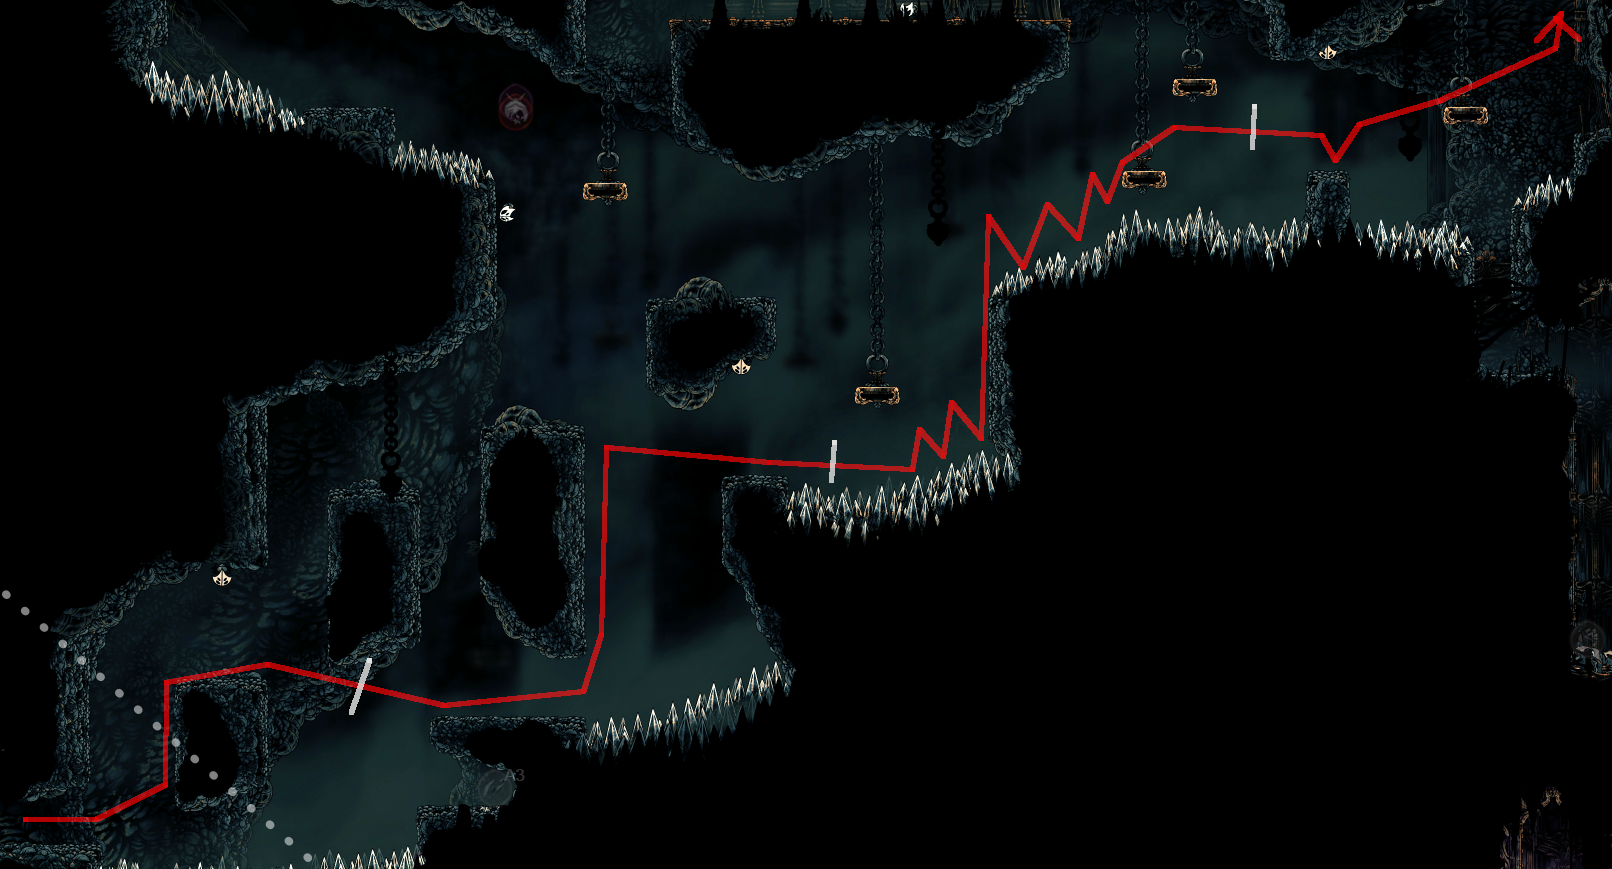
Keep going and climb up, this segment is very easy as long as you don’t try to do it all in one go. When the vapor clears, freefall and dash (again) then take your time to wall jump to the next part. Then, even if it is tempting, wait until the vapor comes and clears again to get a headstart and hopdash with wall jumping to safely reach the end of this area.
Here comes Phantom. This fight is heavily coded by my use of Reaper, so if you’re not using it you might encounter different difficulties. Avoid attacking until the vapor clears or you’ll be exposed to an counter you can’t see coming. Always try to stay near the middle thirds of the room(not quite the middle, either left or right of it, but not against the walls), so you can cleanly dodge an attack and fall back to the other side. Keep the neutral large and safe after any attack to deal with any risk. You can use the pimpillo to get rid of the popup but it’s not that useful here.
Jump Throw: The main reason you should never jump in that fight unless it’s to deal with a move. Check where she stops then go under to the other side while punishing once, then punish again while she lands (a spear is the best punish here, or you can attack once or twice). Use the windshield to punish, don’t aim up.
Long Throw: Simply jump and pogo, if you miss it still dodges. Dash away to neutral.
Three Strikes: Same as long throw, jump and pogo then dash to neutral. Happens often when near.
Power Landing: The reason you need to stay near the middle thirds, when it happens run to the other side. Never go for the nearest wall.
Phase Transition: It’s actually a very easy attack to deal with, when it happens make sure you’re near a third, then start walking and run after a second(because going slow will make her landing target close before you run away). Keep doing that while touching the opposite wall each time, and that will make you unable to fail.
For her second phase, it’s pretty much the same, except that you should NOT go back to neutral after an attack, instead avoid moving around (still try to keep to the thirds) so you don’t run into a teleport.
Well done, don’t forget to parry in the QTE and dance while it all plays out. Enter the citadel and don’t fail the basic platforming. Hit the lever, grab the memory locket, open the fast travel, then touch and go outside to trigger the Lace yap and jump back above the bell ringer to call the beast and quickly open the yellow memory slot, swap to Silk Spear and remove Barbed Bracelet.
Far Fields
Run through the rooms, don’t forget to jump above the bell worker. Say hi to no Lace, enter the Far Fields and skip the bell ringing. Keep running, but stop when nearing the first plant and spear it, keep going and jump above the two ant groups, then spear the other plant in the way. The two plants positions are too erratic so I just gave up trying to jump and killing is safer.

Don’t fall and open the fast travel, then freefall and pogo on the explosive before falling further and dash at the right timing to exit the room. Take your time to make safe jumps above lava.
Freefall and airtime with a pogo to make sure you land well, parkour away. Don’t forget to sit on the bench before leaving.
Slow down to either jump above or push the plant, then kill the pilgrim before going to the first spiner. When gathering spines, reaper range makes things easier, and you can easily get the horizontal spines by attacking up while the spine aims at your back. Spear or attack the next pilgrim, gather more spines then kill the small pilgrim and spear the explosive. Go gather more spines above then proceed to the next room.
Jump carefully and spear the 2 plants at once. Gather the last spines you need (it should be just enough), throw a pimpillo and spear for good measure to kill the two pilgrims then run to the weavenest to grab the Anklets. Honestly, I haven’t done the maths, and in the long run the speed boost might not be that useful for a hitless run due to losing silk. But for any% I will take it for the sake of going faster. Benchwarp back, equip the anklets, get the Cloak and leave to face Fourth Chorus.

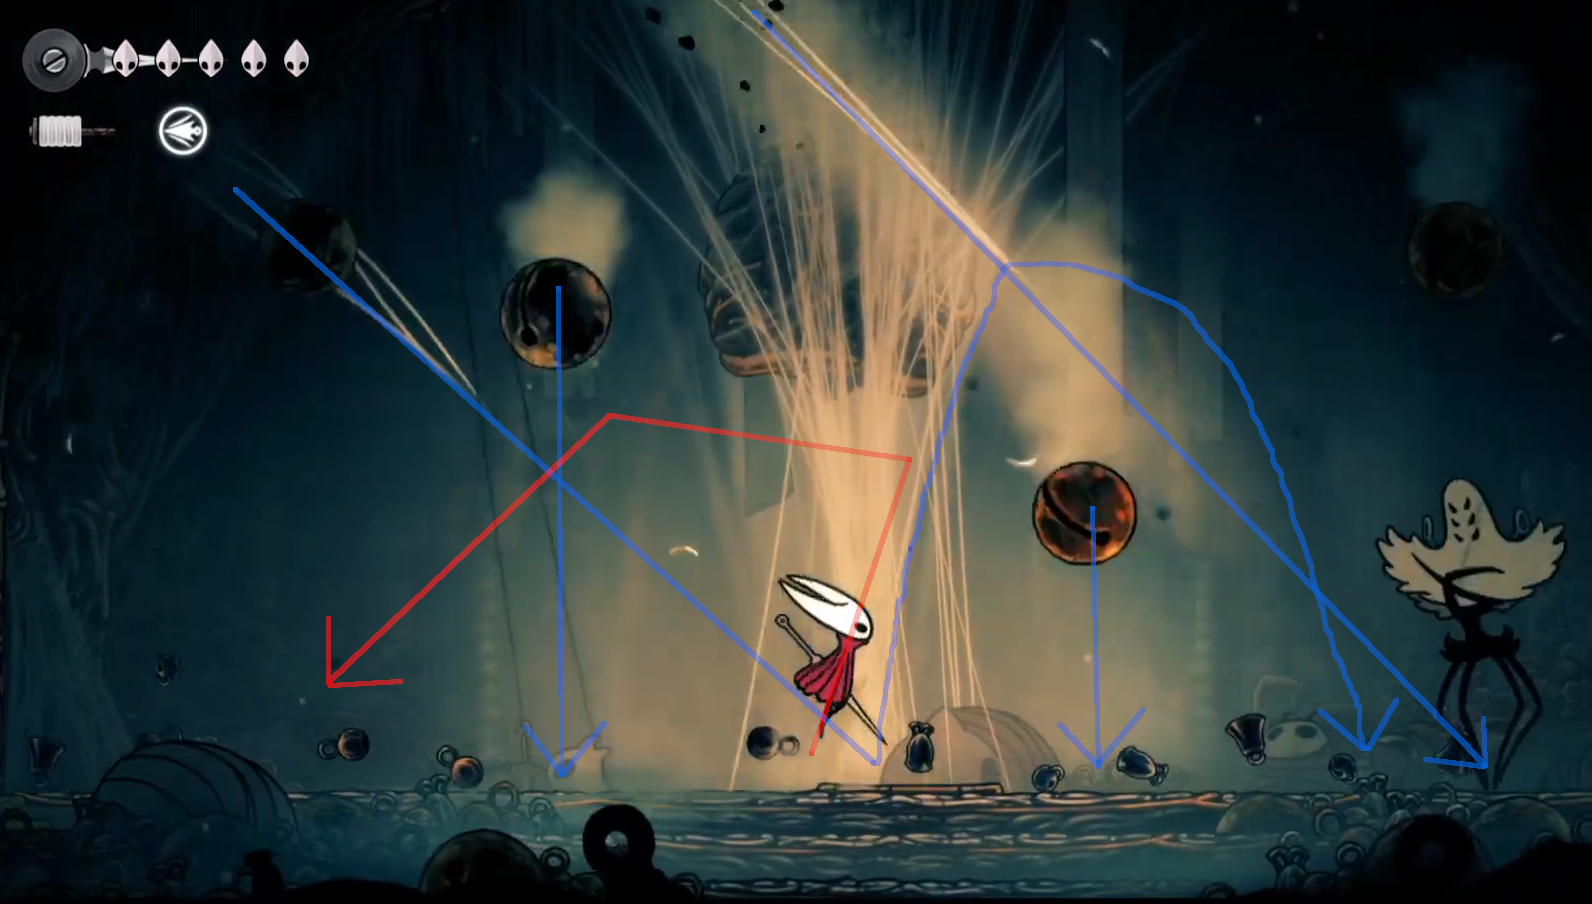
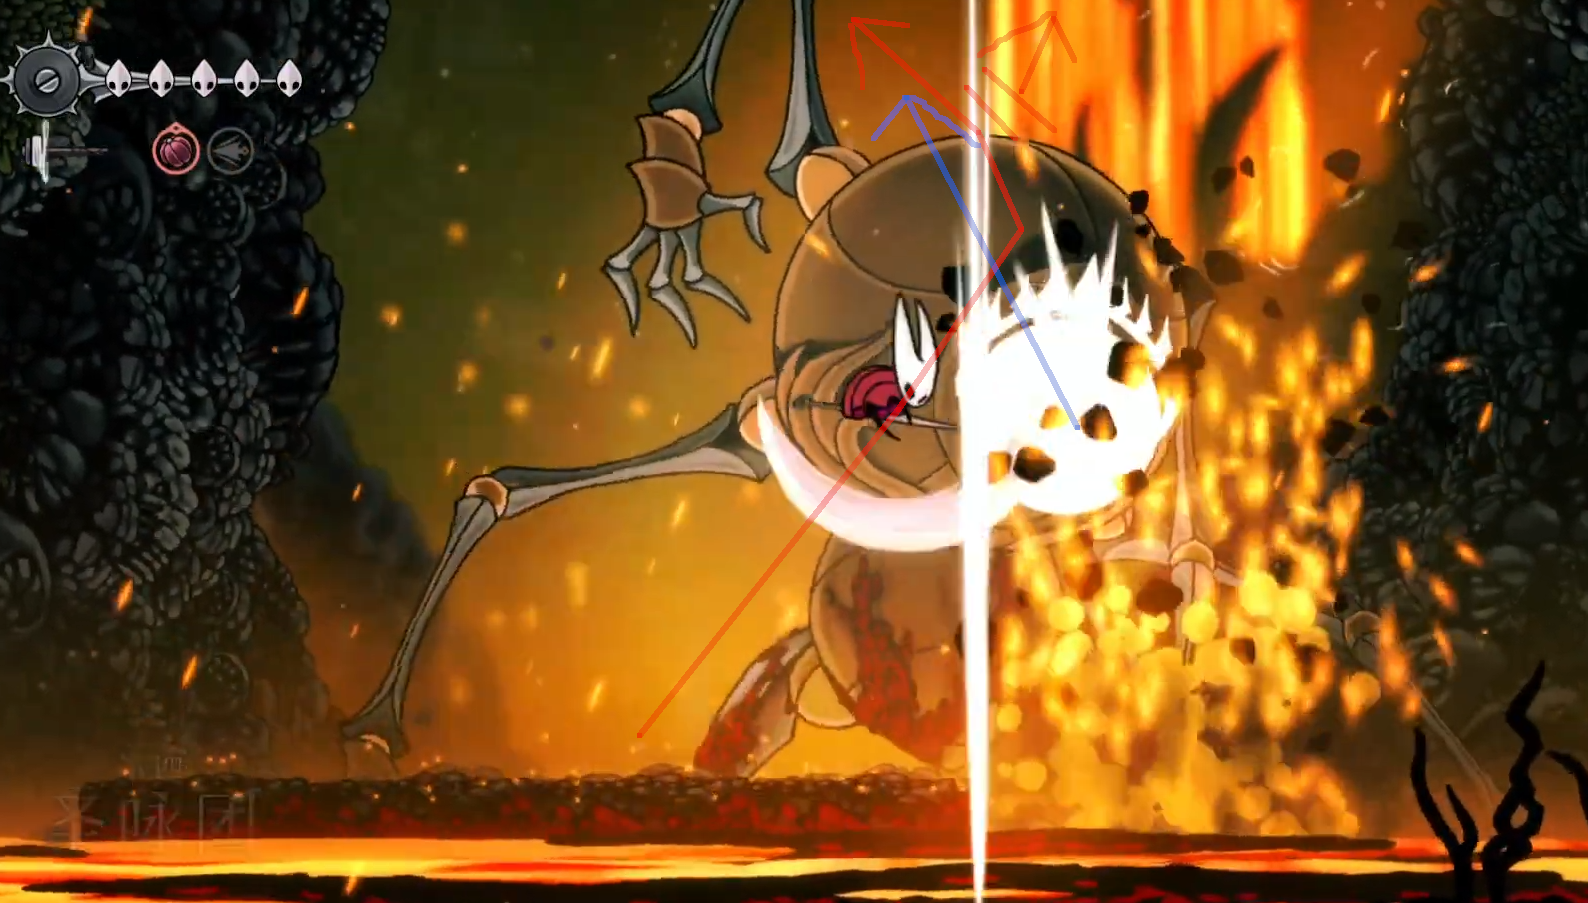
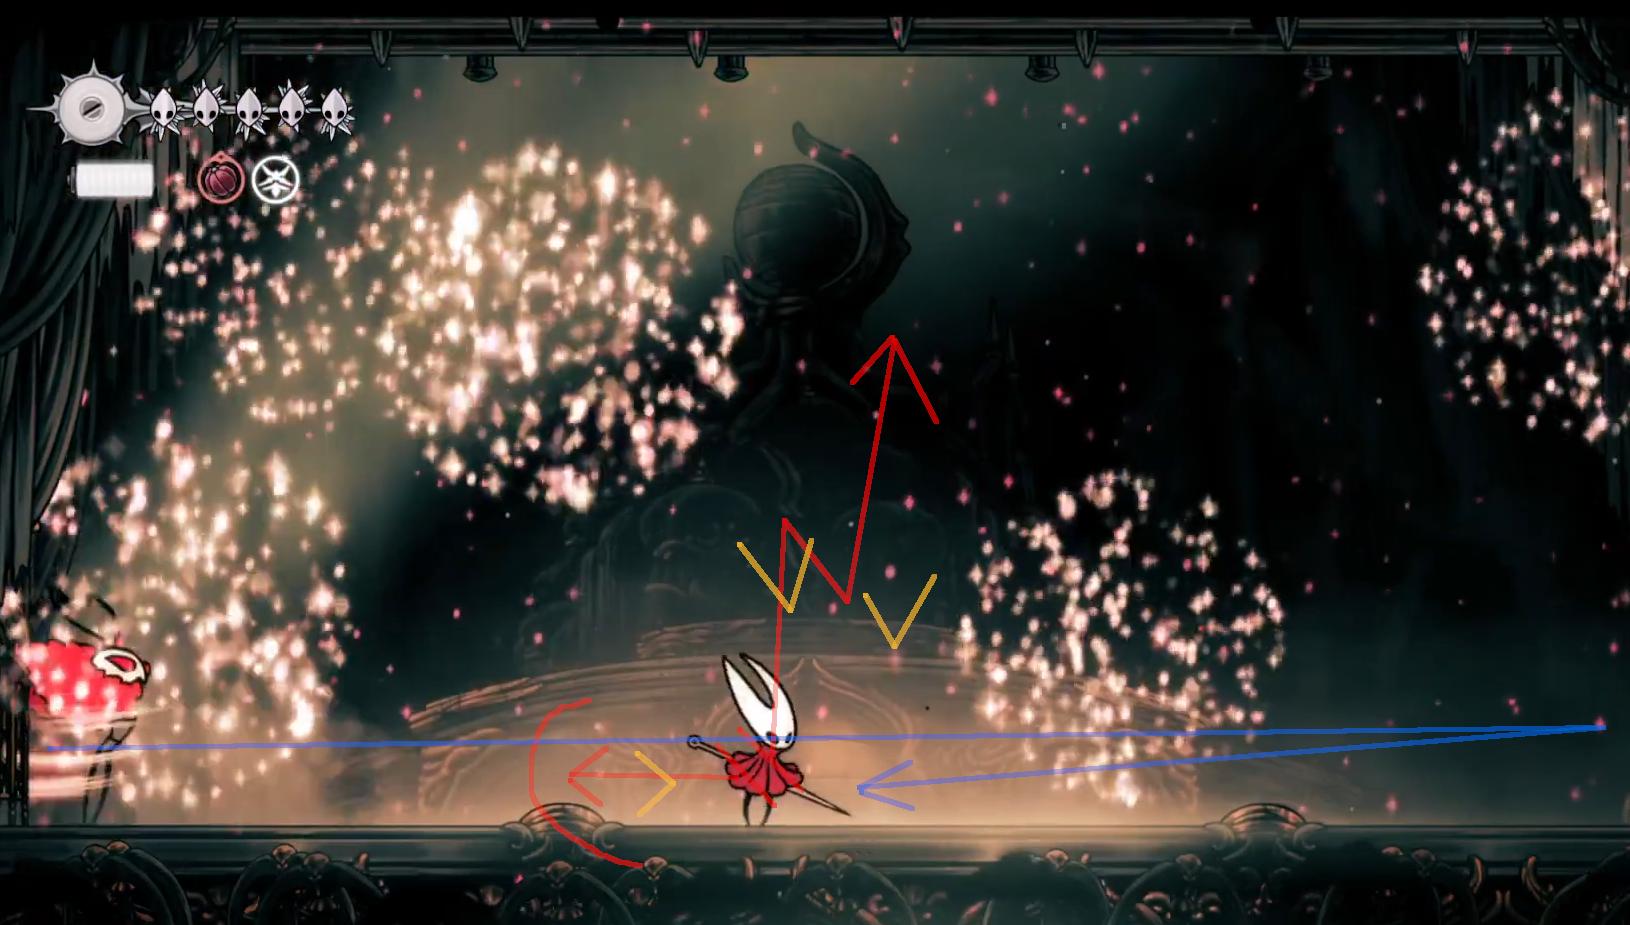
Let’s be honest, this won’t be a real fight. I have heard of a direct skip, however I just can’t do it consistently, and I hate gambling my run on failing a precise trick. So instead we’ll speedkill the boss! Wait for an attack then pogo on its head, cloak to reposition, pogo again, reposition then decide to go for left or right, and you’ll want to pogo high enough to quickly hit the explosive by attacking up at your apex. Then cloak to reposition and keep the pogo until you get the second explosive. Fall down and keep safe, you can leave now.
If you fail and fall, go back up. If you somehow keep failing until the boss gets stunned once, give up on the speedkill and do a regular kill (or restart kek). Don’t ever try to pogo above when it can fall rocks on you at any time. Once settled run back to the fast travel, go to the citadel, equip the barbed bracelet and exit.
Cogwork Core
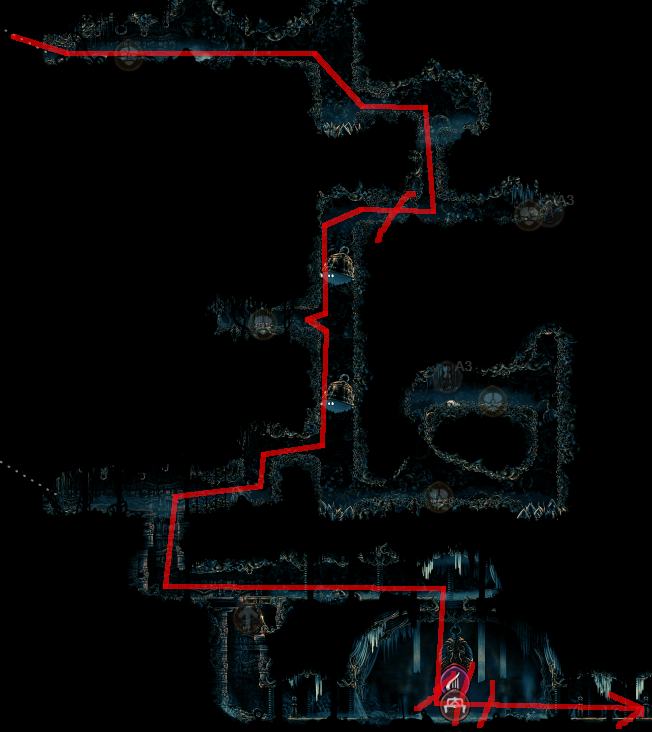
Climb up safely, when nearing the flying guard, hug the right wall to skip the encounter and keep climbing. Wait until the pilgrim leaves or kill it. Stop at the choir elder, hit it twice when it lands, then spear it on the second landing to proceed.
Jump above the sleeping bell thrower and climb the wall to the top. Pogo on the bells then the spikes to keep going up while avoiding enemies, leave the room. Hit the lever and touch and go back to skip the animation.
Don’t forget to hit the lever again while leaving, do simple parkour while the enemies don’t understand and enter the steam vents. DO NOT RUN, walk to the first vent, wait until the vapor stops then quickly dash through, keep going each time or wait. Run and go up, keep running but slow down and take your time for a safe pogo to skip the three giant guards. Meet the Cogwork Dancers.
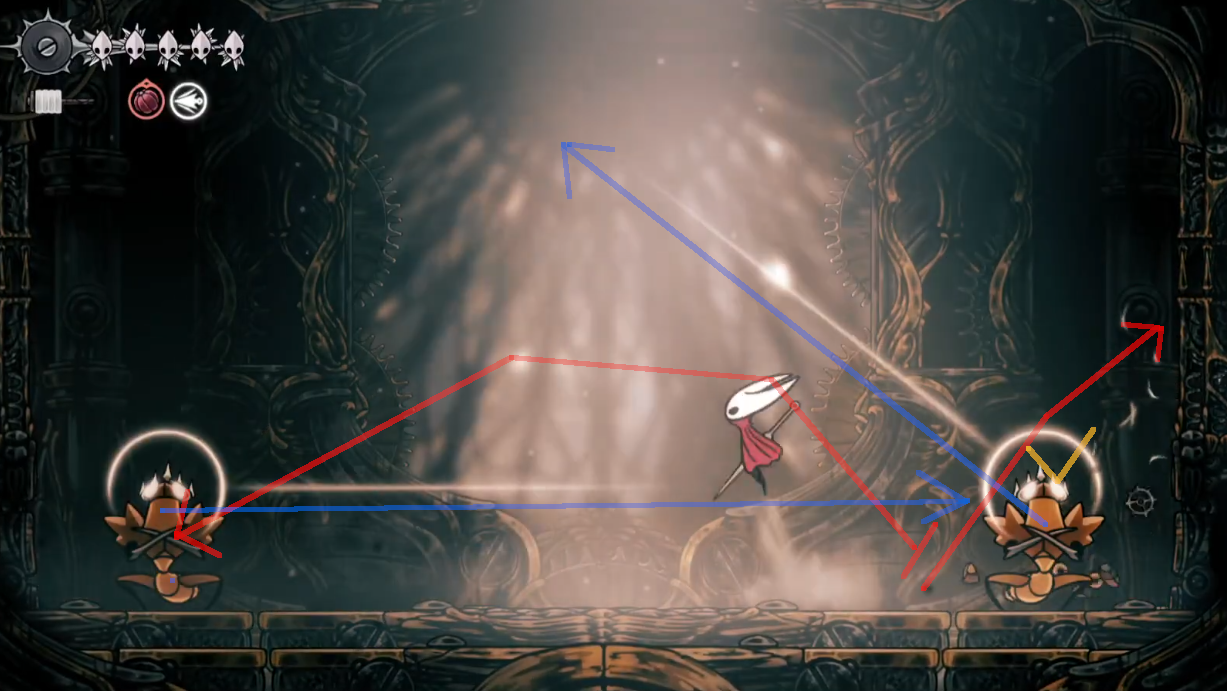
Stand near the right one at the start, follow by a hit and a spear. Then hop and attack again in the middle, dodge to the right and punish two more times before hopping and throwing a spear. Then just finish that phase as you can, it’s slow and easy to dodge. Avoid jumping/spear before knowing where the attacks will go, and you’re pretty much set for the whole fight. Learn how to deal with all the patterns and you can autopilot the fight, except few situations. Keep tracking the one you want to defeat since health isn’t shared, and for the third part, focus on the left one since it starts later.
People will say to hug the wall, but I’ve gotten hit more by doing that, so I will personally say to avoid doing that even though it’s easy to fall back there. Especially the left wall which has a small ledge blocking your jumps. Benchwarp after the last dancer is defeated (make sure to wait a bit otherwise it will reset the fight :))) ) and skip all the dialogues. The second major milestone of the run is completed!
Fall down, bait the cogworker and tap it away, freefall on the right (be mindful of the wallbot) and go slightly left to avoid the cogs. Keep falling down using the cloak for safety, bait the 2 cogworkers 1 by 1 sending them to the pit, then freefall to the right again avoiding the wallbot, wait until the cogsaw goes down then float to the next platform. Get rid of the cogworker (it’s safer if you fail a jump later) then take your time until the cogsaw goes down to pogo and climb the wall left, then float to the right wall after the cogsaws pass. Wait until it goes back down and go left then climb up with a pogo on the spikes. Make use of the pogo’s range to reach the ledge above and open the door (useless) until the cogsaws come back and pogo to the next room.
Dash jump immediately then float dash under the second cogsaw (unless the coglancer is too close) hop above the enemy and wait until the cogsaw is close to pogo, float, pogo, float again to the door, exit.
Whispering Vaults
Things start of with more basic parkour, then you have an arena to go through, a tough one.
1: Stay on the left, hit the fencer twice followed by a spear into a pimpillo. Finish off the small choir if it didn’t get caught in the blast. Take your time on the large choir remaining.
2: Go in the middle, hit the choir elder once then dodge above the large choir. Follow with an immediate spear to hit both, and another pimpillo to finish. Kill the remaining enemy.
3: Hug the left wall, when the wave appears jump and throw a spear. Quickly finish the small choir and bell thrower, be mindful of the flying guard. Once it is alone, take your time.
4: Run to the right wall, hit the fencer twice followed by a spear into a pimpillo (again). Jump to avoid the small choir and kill it while dodging incoming bells. Dodge the tall choir and kill the bell thrower as you like while the other walks the room. Finish things off.
5: Throw a spear on spawn, dodge and throw another spear, throw the last pimpillo and breathe of relief.
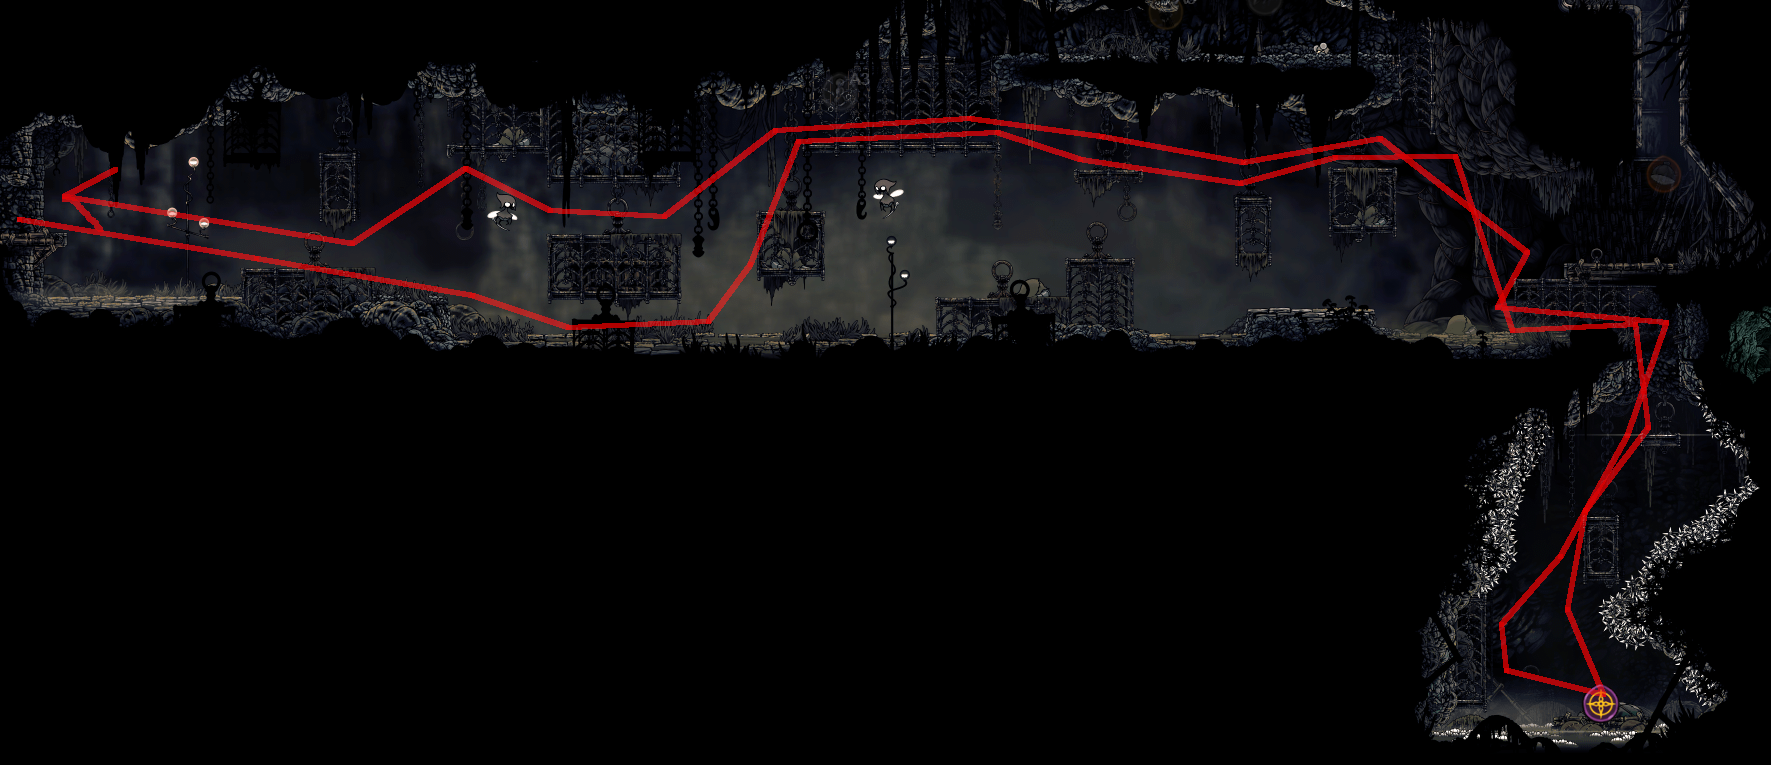
Freefall near the wall to avoid the lampbearer, then run like mad. Stop when nearing the vaultkeeper and wait until it charges to dodge above and continue. Fall down and go left, there you’ll want to wake the scrollreader and time it so you pogo on it while it lands and skip to the left room.
I’m not going to waste time explaining the puzzle room, there’s no enemy, just go through it, grab the oil, and leave to the right(make use of the reaper lunge to quickly dodge above the scrollreader). Continue until the next large room. Freefall and follow the box tracks to skip any fighting, exit left. Then climb up(hug the right wall to avoid the lampbearer) to reach the Trobbio theatre. Don’t forget to jump above the cogs and proceed to the entrance. You’ll want to leave and fall down to the fast travel point, sit on the bench and swap to Cross Stitch. Travel to Bellhart and quickly upgrade your needle then benchwarp back.
Would you look at the time, it’s Trobbio clock! This fight can get very chaotic so make sure to be ready to parry at any time when necessary. Get a few free hits at the start then improvise! Try to avoid staying in the center or in a corner, always mindful of a potential trapdoor hit. Steal a hit when he flies above you or stops near you, never stay under (or above) him too long.
Balls Throw: If it happens in a corner, this is the most obnoxious attack to deal with, run away and try to dodge or parry. If there is no bad rebound, just stay near and wait until the balls go off. Not really punishable safely.
Centerstage: Reaper range makes you semi immune to the initial burst so just position where you won’t get hit after punishing. Be very careful of potential attack overlaps and stay far or avoid bursts above your head.
Balls Trap: The easiest attack but also impossible to punish. Just walk to the middle and wait.
Tornado: Either you’re trapped or have too much silk, then simply parry then punish with another hit while you phase through. Otherwise pogo above, float until he comes back and pogo again. You’ll use most of your silk on this attack, no better time to punish for free.
Showtime: Don’t stand on the fireworks, if you’re in a difficult position hop first then dash as the base has a bigger hitbox. See the last firework to predict where Trobbio will come out and get some free punish.
Take the elevator, wait. Open the door and send the elevator back. Long jump twice then freefall on the platform, dash under the next one to avoid fighting. Skip the title card and sit on the bench to swap to Silk Spear for the last time.
Underworks
Freefall for a bit, move to the right after the cogbot and break your fall a bit to quickly continue the freefall left of the explosive bot. Don’t forget to float and kite the second explosive bot while hopping.
This room is very special. Either you know a run through and you perform it perfectly, or you stop for half a second and you’ll be forced to slowly pass each jump carefully. Either way don’t go for the inbetween. Come in running then longjump to the second lavafall, dash when it’s clear and dash again to reach the explosive bot. Kill it while hopping and continue while taking your time, if the scrubber hasn’t died be extra careful to dodge it. Then the easiest place to fail, wait carefully for when the lavafall ends, prejump so it’s clear as you arrive and float to the platform. Spear the bot ambush then take your time to exit the room safely.

The final upgrade is upon us, don’t rush the jumps and fail, make use of float to be more precise. Once you have the Hookline, longjump and float until you can hook the third ring. Then float and hook the two rings to reach up. Longjump again and hook the cogbots to reach the next arena.
1: Hit the scrubber the hop and spear to the right, finish the brusher.
2: Kite the two explobots.
3: Preemptive jump when the wave appears then spear and throw a pimpillo. Finish things off or throw another pimpillo to skip this horrible wave.
4: Kite the explobot, then spear the large bug. Finish with two hits.
5: Kite the right explobot, then spear the left one, leave.
Longjump and float, then hook the spikes and pogo twice to reach the ledge. Hook the spikes and pogo twice, then hook left and climb out.
Jump down the elevator shaft and float then hook right to enter the large room. Climb, pass under the spider then hook, climb, pass under the spider and hook again, pogo twice, climb and pogo until the platform. Hook and quickly jump to the platform to escape the spider and leave. The rest is basic platforming I won’t describe, Phantom is defeated so there is near no danger here.
Cogwork Core 2
Leave after getting the scroll, safely jump above the vaultkeeper then approach the lampbearer until it backs away then quickly jump and leave to push the block. Push another block and keep climbing, hook right to avoid a lampbearer and pass a lever and another block until you reach the melody. Then leave to the cogwork core from where you entered.
Push the block and wait until the drapemite walks by to hook above it and leave. Hook and float to quickly skip most of the cogsaw parts, be mindful of the enemy inbetween and proceed. Hook to the left wall and wait until the cogsaw comes back to you. Then jump and hook to the right wall, proceed again to the left wall bit and when the cogsaws come back just pogo twice and leave.
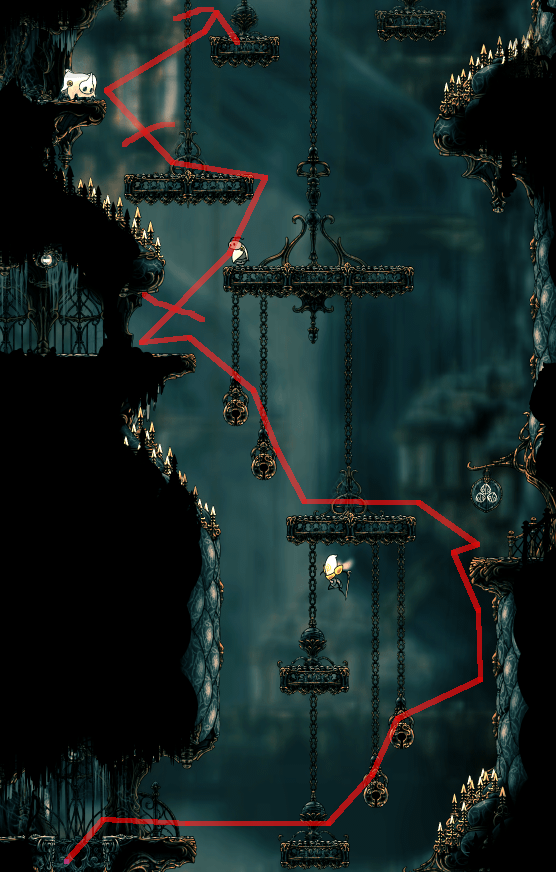
Here comes a big piece(here’s a version using Hunter). Enter the main room and hook to the ring, quickly climb and hook the spikebot, then hook the cog, pogo twice and hook the right cogwall. Recover a bit then hook the left cog, pogo more and hook a further cog, keep going and float to the ring. Take your time to kill the wallbot or avoid if it’s high enough, then kill the steambot through the platform, bait the guardbot, open the door and slip under. Climb and reach the second platform, wait for the spikebot to go up and pogo on it followed by a hook to the cog with two more pogo into float. Reposition with a pogo then hook the upper cogs twice with a float, then hook the ring and proceed. Jump early and hook the left cogwall, climb, wait for the cogsaw then pogo on it and hook the left cogs, float, hook and pogo until you reach the leftmost wall, then pogo twice and leave.
The combination is
1 3 3 3
2 0 0 3
0 1 1 1
1 1 0 2
Simply exit in freefall, make ample use of float to avoid danger. Pass by more giant guards and fall to the gourmet room by avoiding some choir enemies.
High Halls
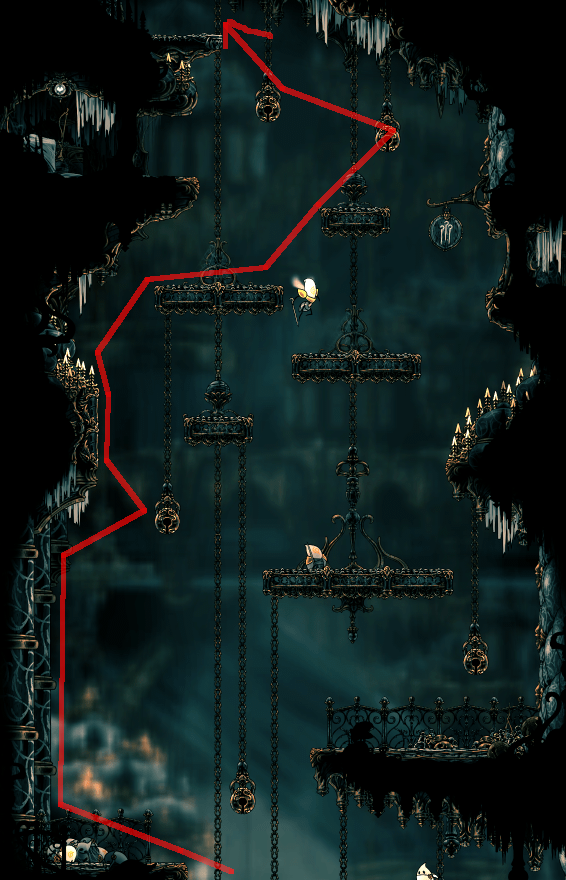
Wait until the choir elder aims at you to run under and climb, wait for the close platforms to retract then jump and hook to the other side, keep climbing and hookjump to the left wall again (be careful of the platform), hook to the right again and finish climbing, then exit the room to reset timings.
Run up and quickly jump on the platform, then climb jump twice, wall run twice, slide down just a bit if you’re too close to the spikes, then jump and hook the bell thrower, hook the spikes wall, finish with a pogo then jump and hook to exit the room to the left. We need to reset the timings so the bell thrower is at the same position each time, to avoid any potential risk of failure.
Long jump above and hook to skip the enemy group (be mindful of potential claw maidens), then simply perform regular parkour. In the water room, longjump the first platform, slow and hook the ring to the next, wait until the maestro flies up to run under and hook away. In the waterwheel room don’t rush and simply hook to rings, take the left side when climbing to skip an encounter.
In the second water room, hook the ring, run under the maestro and hook more rings, when you reach the ambush platform, pogo on the enemy and hook away. Then just floatfall the regular path, the spikes room is not worth mention if you don’t try anything special. Just make sure to sit at the bench, to repair your pimpillos, and set spawn, then enter the ultimate challenge…
I think it’s widely accepted that High Halls Gauntlet is by far the hardest fight in a Silksong run (at least any% I haven’t checked the rest). Thankfully there is a ton of ways to go through the waves… and that’s because there are a ton of ways that things are difficult, each solve is likely to be very personalized with various preferences, it’ll be hard to find a similar solve for each person doing it(here’s a sort of outdated training). Follow the melody and only improvise in some situations. You can use the pimpillo in any scramble situation where multiple enemies are giving you trouble, otherwise it makes the last wave quicker.
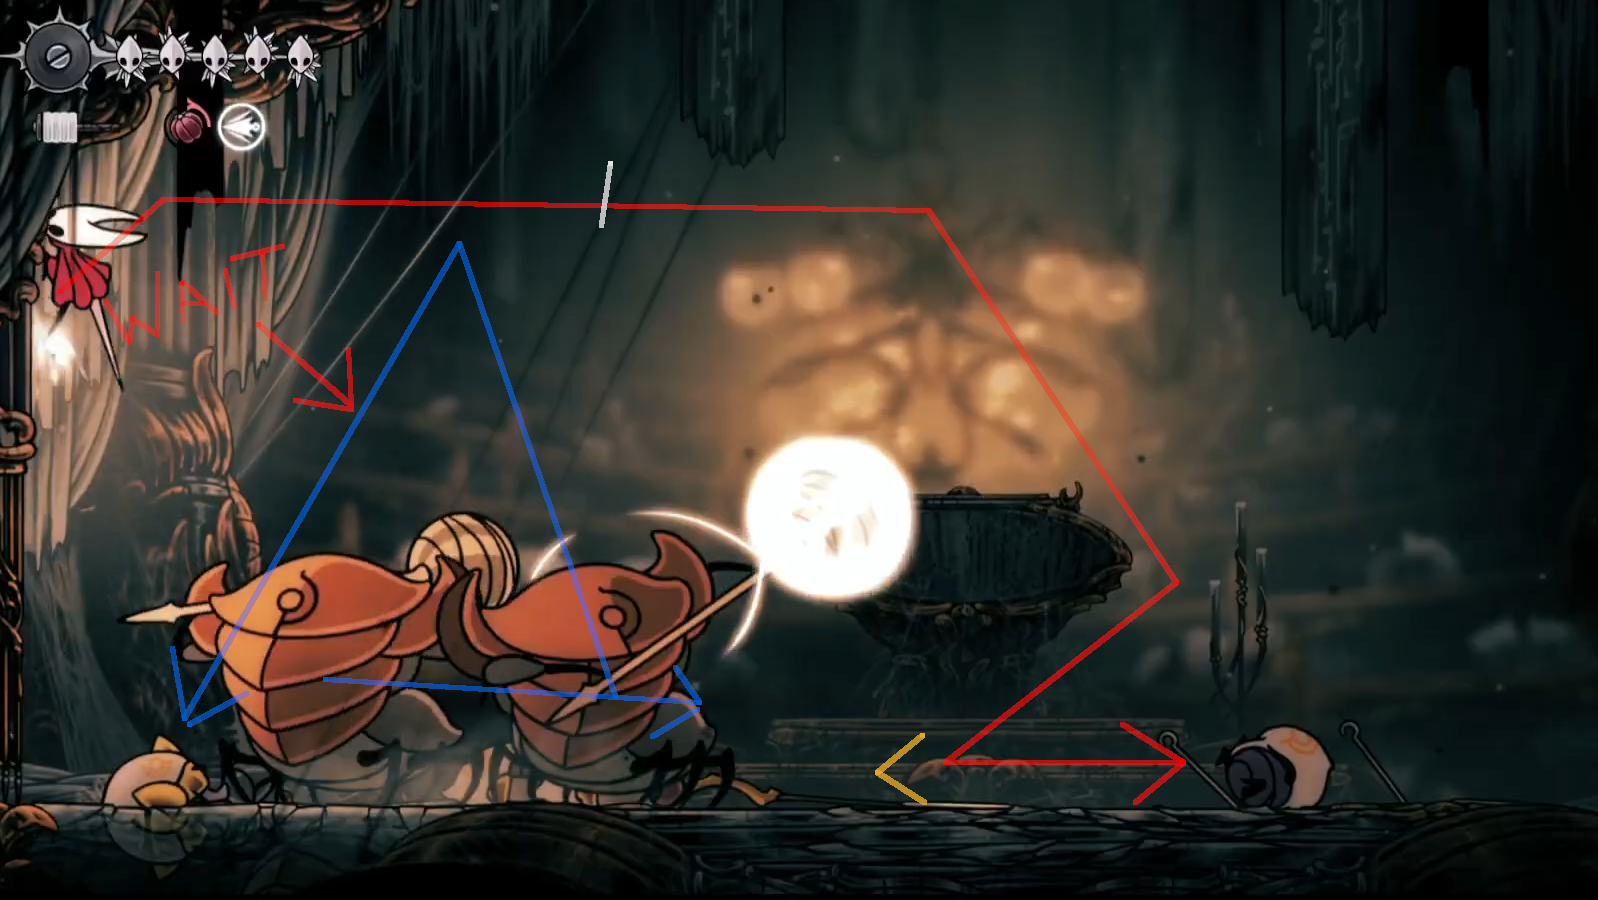
1: Here comes the chess opening, by far the worst wave for consistency because you are forced in an ambush position. Start by hitting the flying guard then hop above the bell ringer and punish. Everything else depends on where the flying guard goes, if it flies far, you’ll have a pin throw to dodge, otherwise it’ll attack or try to parry you. Parry is the easiest, as you can simply wait, punish and finish it with a spear. If it’s attack, dodge a bit more before doing that, the spear height should also hit the other enemies for easier cleanup. For the pin throw, well, steal another hit on the bell ringer and throw the spear, then scramble. Once the flying guard is downed, the rest is basic cleanup, be very careful of the fencer spinjumping you at a terrible time.
2: For this wave, start to the right, hit the fencer twice and spear. Finish the last one.
3: Start to the right, hit the bell thrower once, then climb up and spear once they’re aligned. Finish the rest.
4: Start in the middle, hit the left enemy, bait the right enemy, pogo on top and spear while falling to hit both. Finish the rest.
5: Start left, hit the maestro, quickly go center and spear the left maestro twice(if you don’t have enough, go back under it and finish it patiently), then go back under the right one. It’s a very easy enemy as long as you react to its attacks and only punish when safe. Finish with a spear when he spins.
6: Start middle a bit to the left/right, free hits. The clapper is deceptively easy to fight alone, there’s only one rule: if it moves forward after an attack, it will bash you, if it goes backwards, chase and bash it! It’s like a chess match where every action is winning, counter every move(spear is great while waiting for the large explosion, and it will often trigger a jump bash you can dash under).
7: Hug left, and when the clapper hammer stops clattering, preemptively climb and jump to throw a spear. Finish the rest after dodging.
8: Start left, wait for the bell thrower to dash/float back, then jump and spear both at once. Finish the rest.
9: Start left, hit once, spear both to kill the thrower. Finish the rest.
10: Start right, hit once, spear(it will counter any attack from the flying guard) and finish it then just snooze on the maestro.
11: Here comes the toughest part, remember what I said for the clapper? Well now there’s two, so it’s not easy, at all. What you’ll be looking for is to push duel situations where you can read the enemy attacks and punish, this is a true test of patience. To start with, stay in the middle, then use ranged damage to trigger a jump bash from the left clapper and quickly get both clumped to prevent any pincer move. Otherwise retreat whenever you are too close to walls (as you can’t dodge back a bash), climb, and wait until one does a jump attack, giving you enough leeway to hook away to the other half of the room, and continue the kiting. Keep going, try to steal some spear hits for double damage, and throw all your pimpillo when waiting. When one is clapped, you won. The rest is finished.
The Cradle
Get the last melody, benchwarp to refill and swap to the hunter crest. The next two boss fights are a joke with hunter, it’s not debatable even for a reaper main. Avoid the giant guards on the way and open the path to the cradle. Lace 2 is the most pitiful fight of this run, a few secret tricks make her so easy you feel sorry for her. At any time if things go too fast you can just dodge and keep going instead of punishing. She can’t do anything against jumping.
3 Slash: A pitiful move that you can simply jump above and punish with a backwards pogo. Impossible to fail, even if it misses.
1-3 Charge: A pitiful move that you can simply jump above and punish with a backwards pogo. If you’re too far you might want to do a preemptive pogo instead to punish. Jump again if you miss and she targets you.
Parry: A pitiful move that you can simply wait out and punish with a spear. She’s almost guaranteed to do it after finishing a move(like charge) near you.
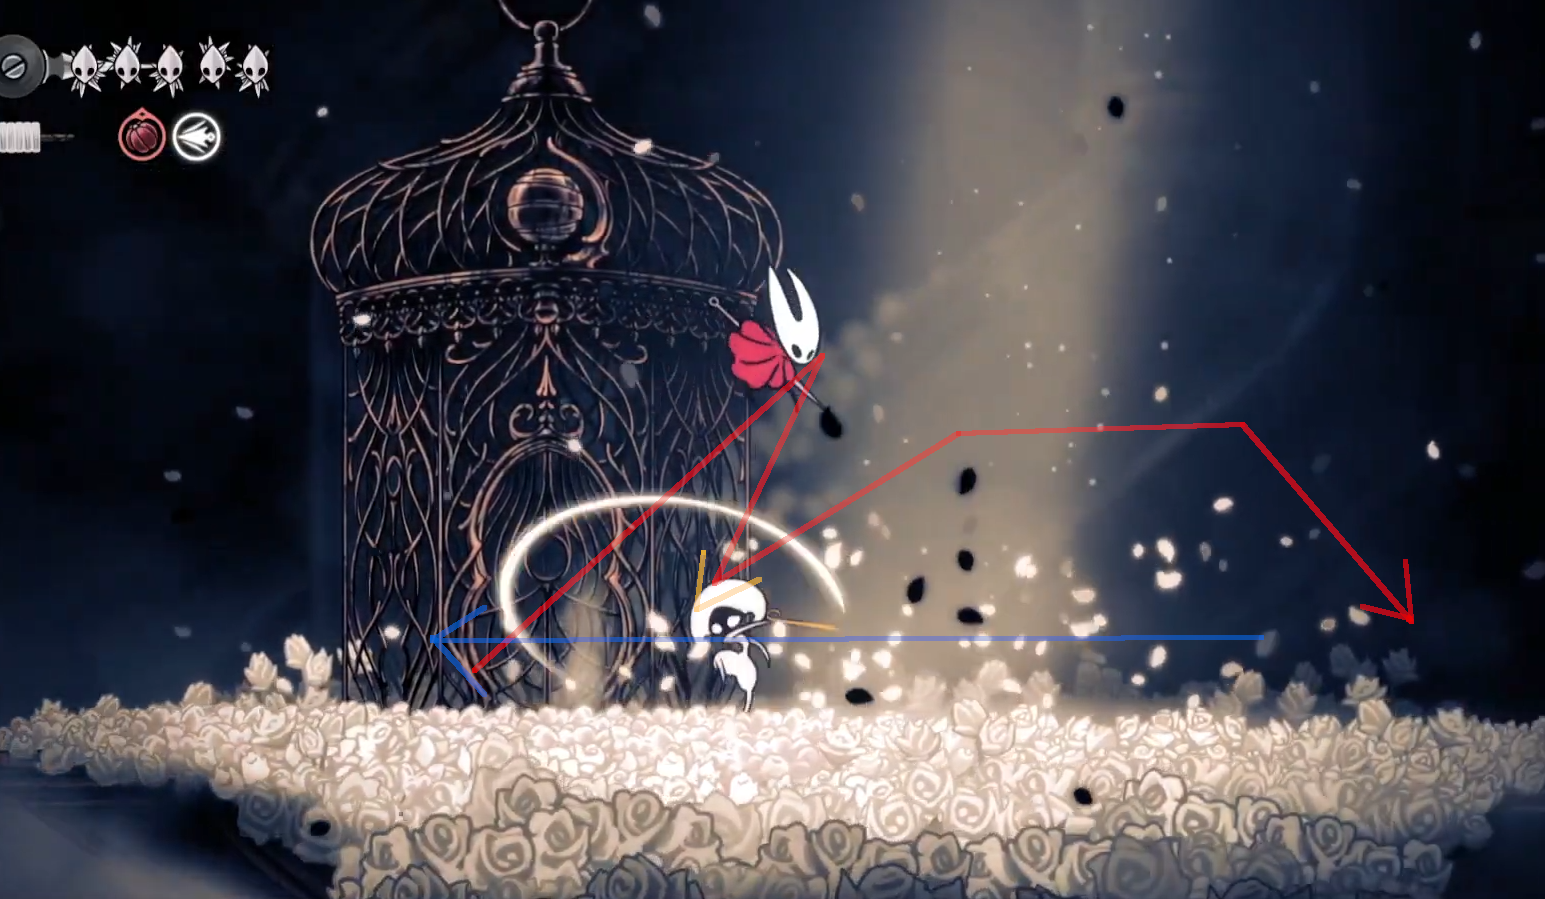
Spinjump: A pitiful move that you can simply wait and hop with a punish while falling down. This is the gateway to free cheese, it’s hard to not do it even intentionally, poor Lace. Each time you manage to smack her head, she’ll instantly perform it again. Just keep going until she’s downed.
Flurry Landing: A pitiful move that you can simply dash out and punish with a spear, twice. If you don’t have silk, dash attack and run past her on first landing. Don’t punish her last landing.
Skip the yapping, go through the dream (don’t mess up here lol), and enter the top of the cradle. It’s just basic parkour but don’t choke here.

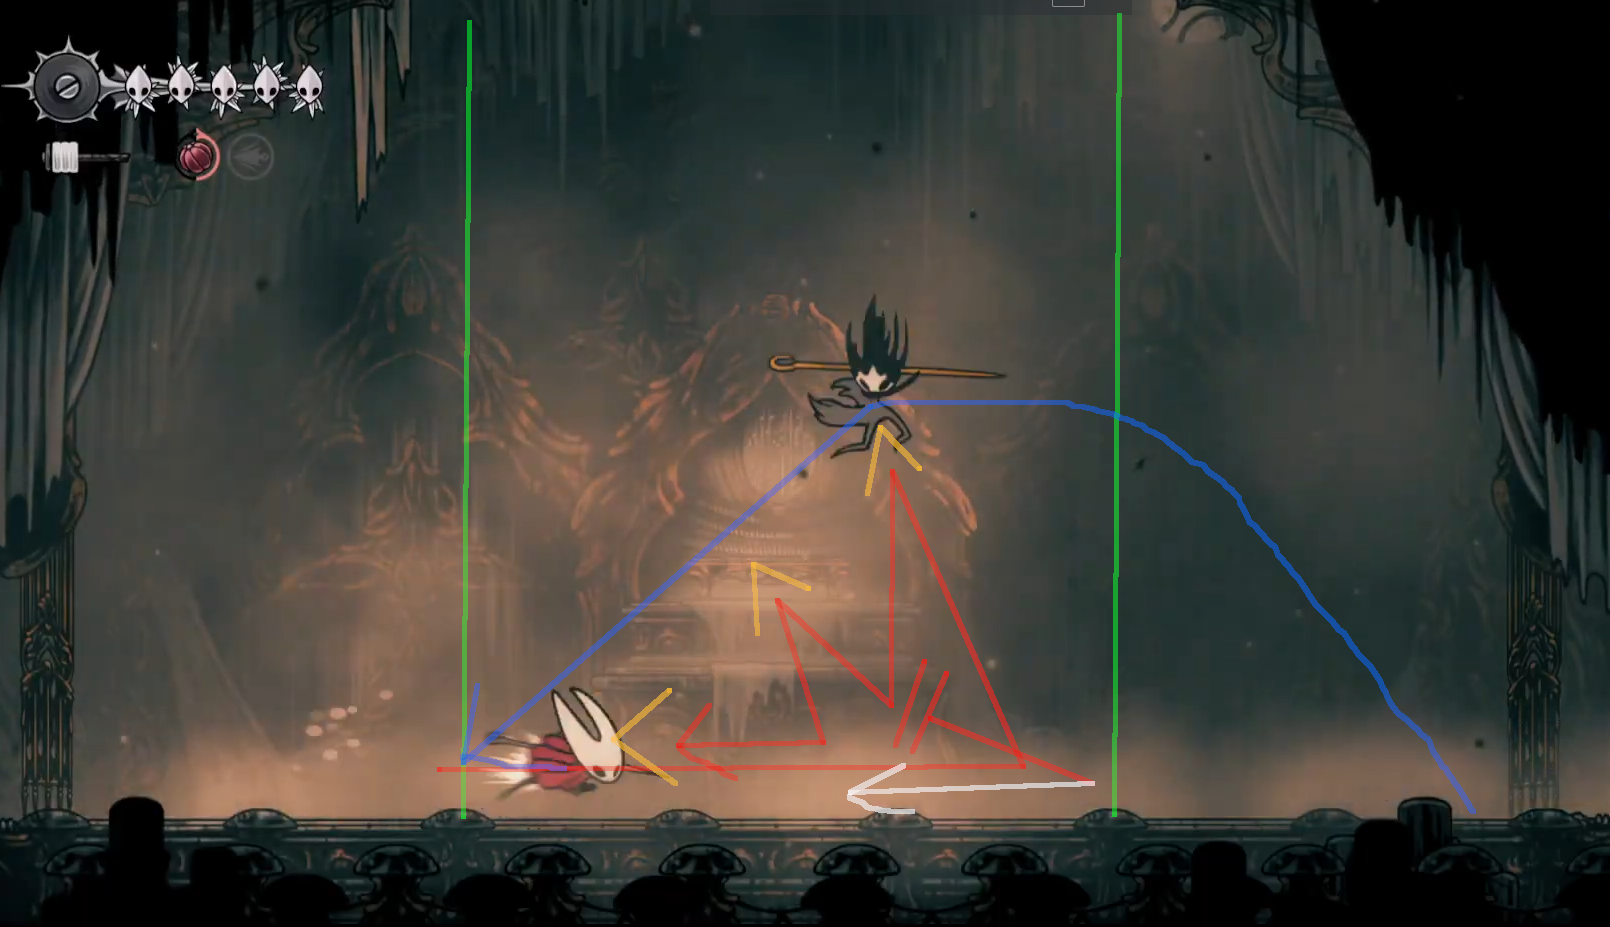
Taunt and begin the final fight. Like most previous fights, avoid jumping before the boss attacks, punish and stay safe. Most of your damage should be done through shorthopping with up attacks to limit your airtime as much as possible and deal a ton of damage. Because of the amount of hits you can freely inflict, after each move you should try to punish with a spear. Clean up the floor spikes asap, don’t let them linger and put you in trouble.
3 Blades: Easy to dodge, however you can punish it even better. Dodge the first then position well to dodge the second wave while throwing a spear. Wait for the third if the second wave is vertical.
Silk Threads: Make sure to be well positioned then jump if needed and float(or spear if you have the silk). When there are two in a row, fall back and make sure to be in a good spot, you have some time don’t rush it and fail.
Sweep: This is the move why you really don’t want to be jumping around. When it happens, you want to be ready to jump and punish as you can or just dodge.

Conclusion
And there we go, it’s far from perfect, I blundered a few moments, but this is my full script for any%. Reaper mist is the safest for me, but most people use hunter bells, where hunter deals a lot more damage and the route is slightly faster. I gave up on it after a number of tries as I would get hit a ton more, and it started destroying my fingers because it’s a ton more mechanically active (also wavedashing is a curse you can’t prevent). Also taking the wormways and mist path makes you skip 2 boss fights and 2 arenas, why wouldn’t I want that.
I want to consider a true end run at some point, will depend on how schedule goes, and maybe some DLC fun too.